
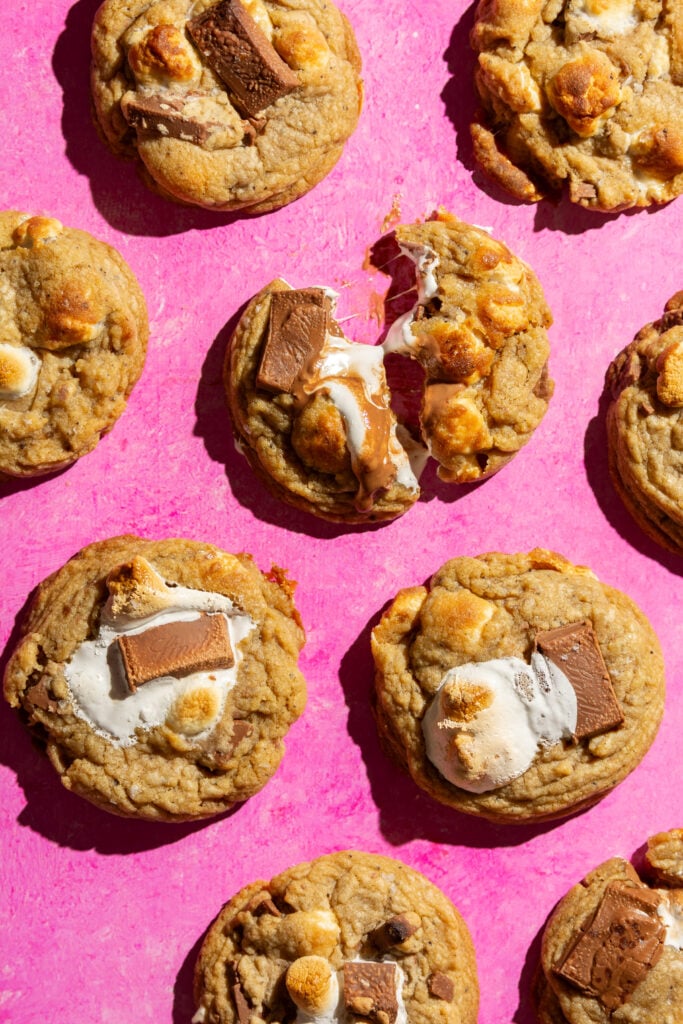
No Chill Brown Butter S'mores Cookies
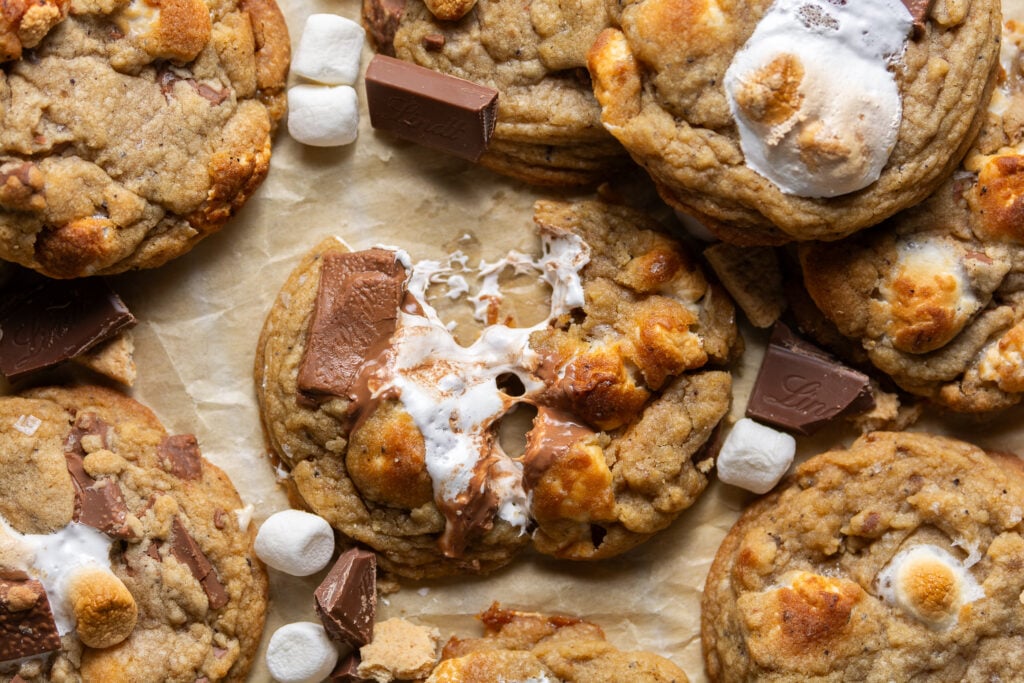
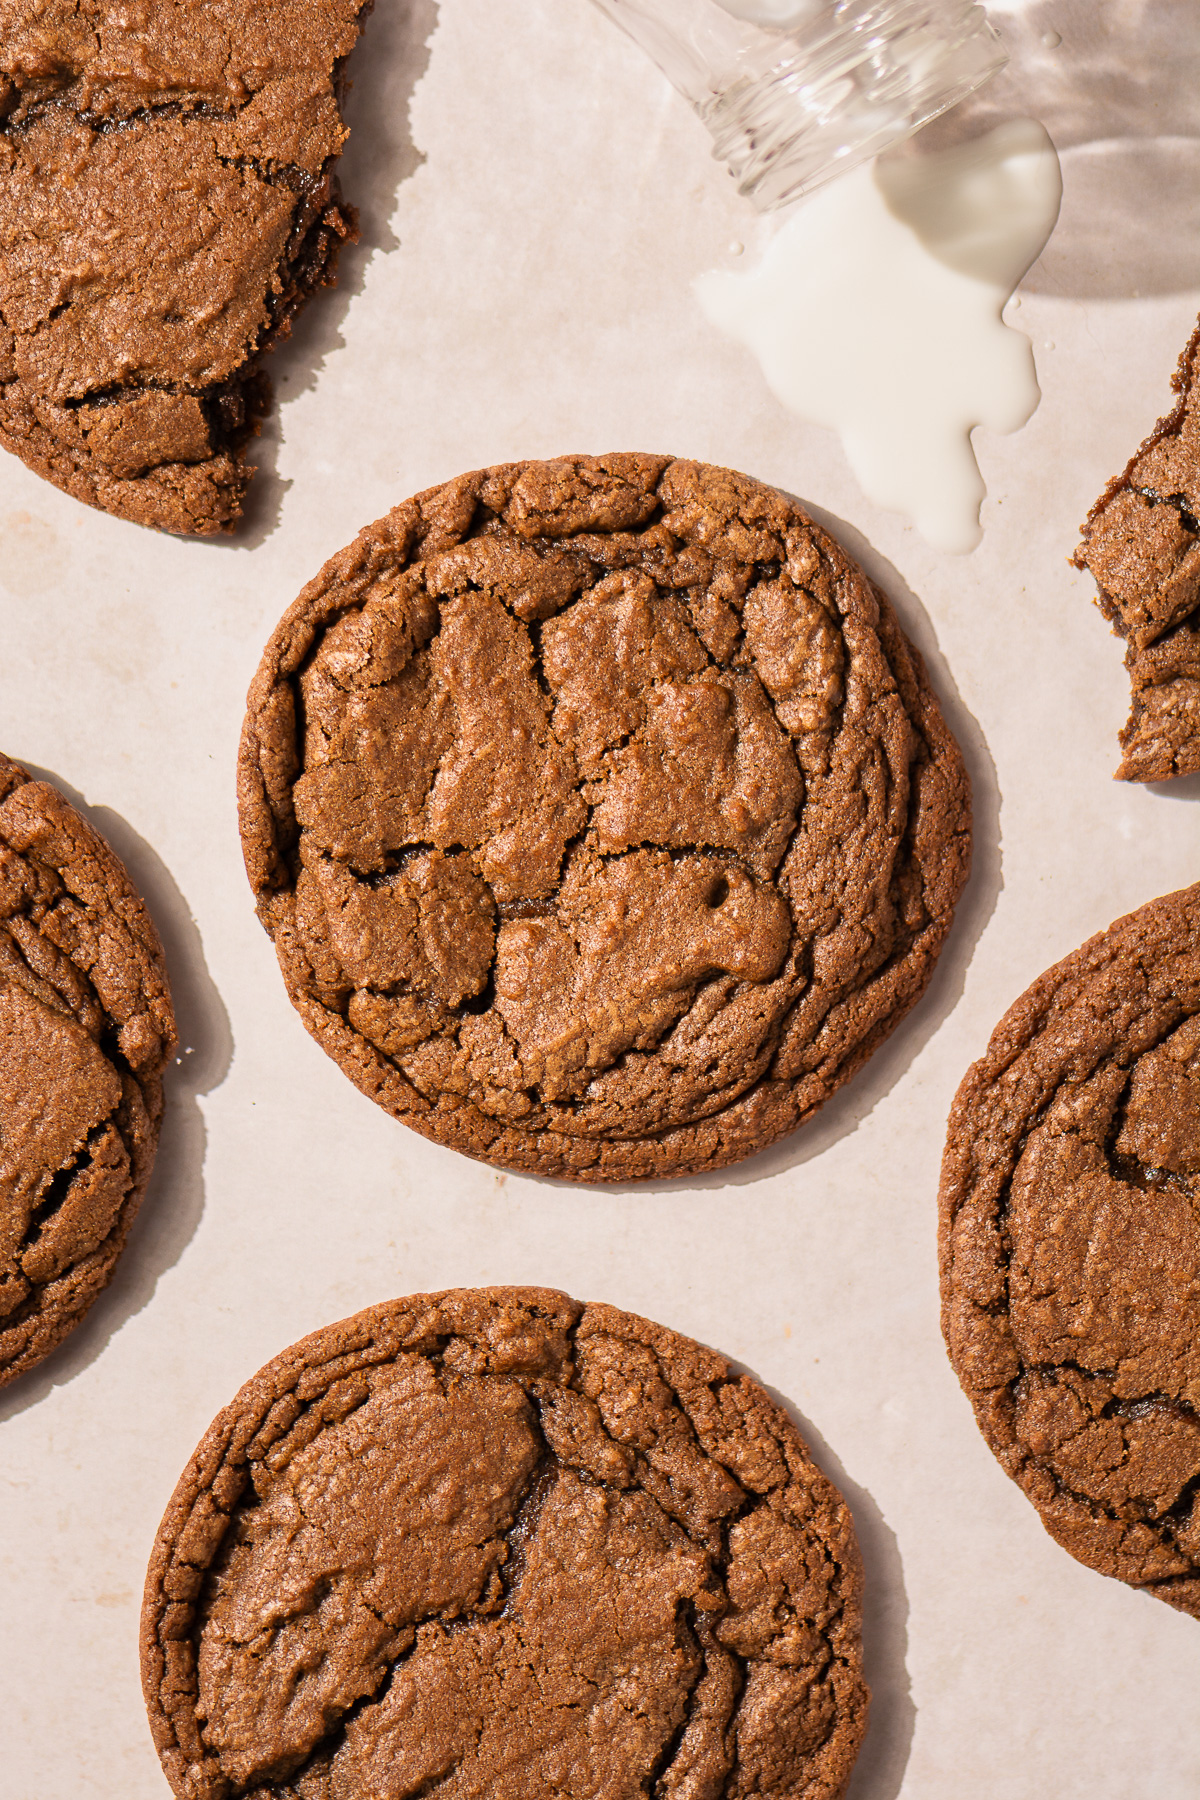
These no chill brown butter s'mores cookies are a fast ascending favorite in my household and honestly that comes as no surprise! It's a chewy cookie with the sweet & nutty aroma of browned butter, bursts of gooey marshmallows and rich pockets of chopped chocolate. And as if that wasn't enough to love, the best part is this recipe doesn't require any chilling!
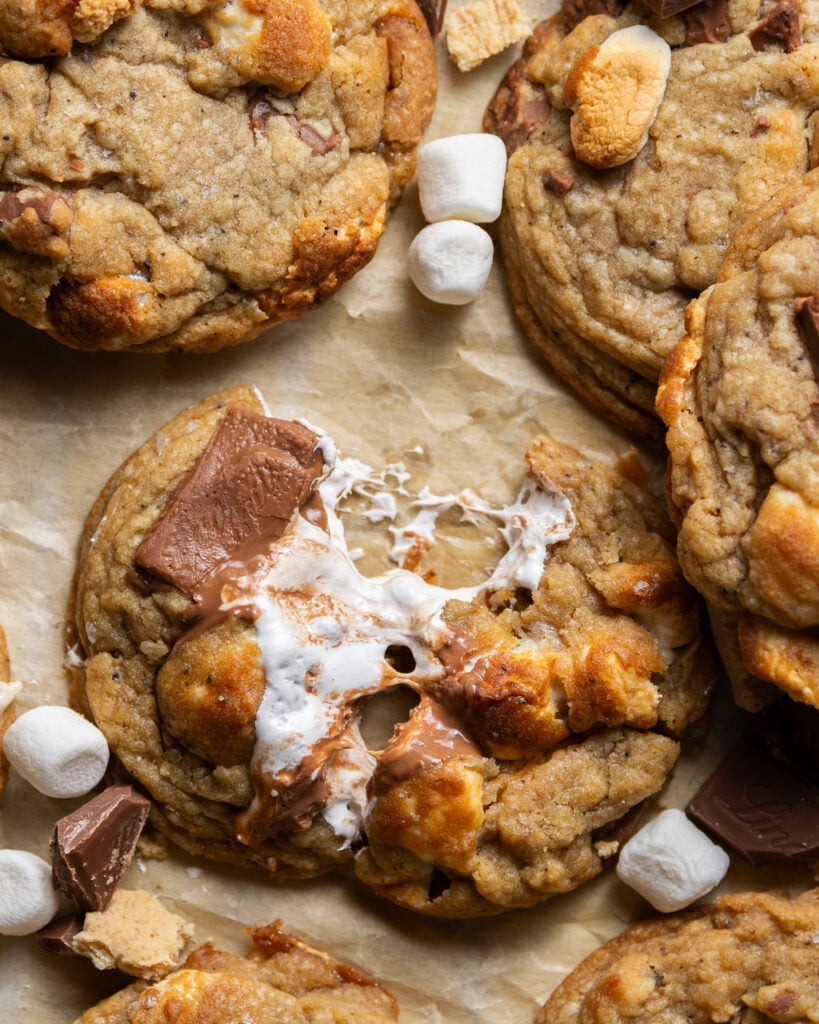
These cookies are hand down one of my best cookie recipes and the perfect sweet treat for anyone who enjoys the campfire classic and or a classic chocolate chip cookie! Like my funfetti sugar cookies and Grinch snickerdoodle cookies the process for the s'mores cookies is super simple and everything comes together in one bowl allowing for easy and quick clean up! They'll become your new favorite recipe in no time.
key ingredients
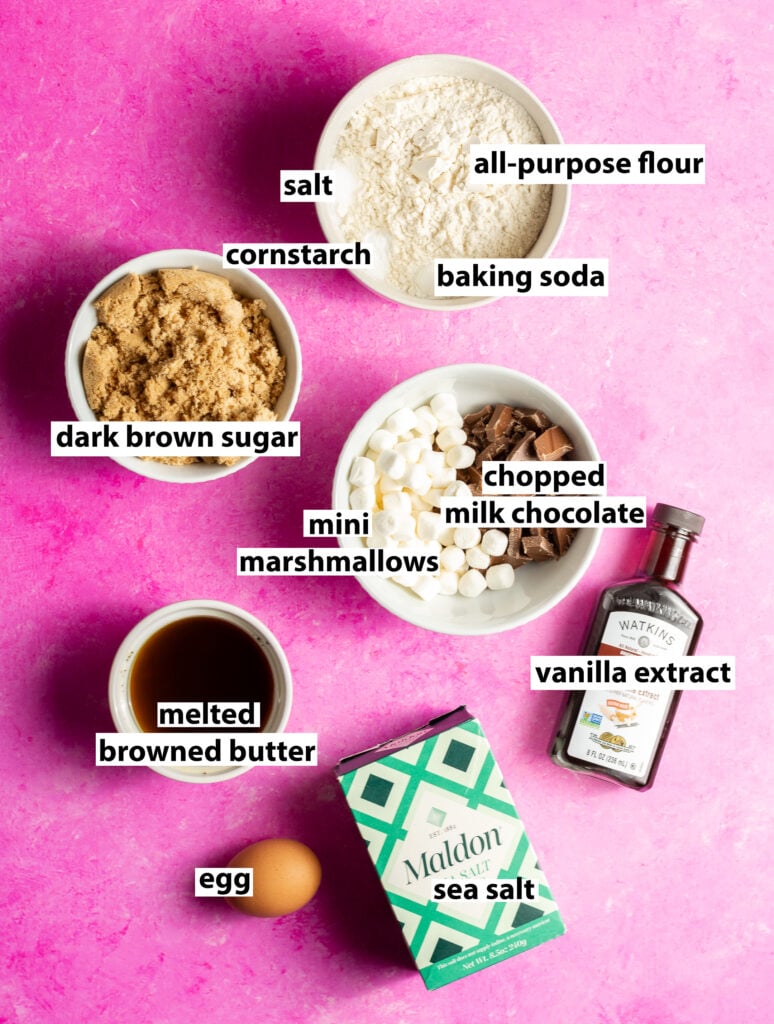
All-purpose flour. Contributes a stable structure since browning butter concentrates the fat content which could cause the cookie to crumble without enough enough gluten.
Dark brown sugar. Complements the warm flavor of the browned butter and the extra molasses makes a chewy cookie vs white sugar which would cause a crisper cookie.
Brown butter. Butter melted over medium heat (or high heat for the more experienced cook) until the milk solids are toasted and give off a sweet & nutty aroma.
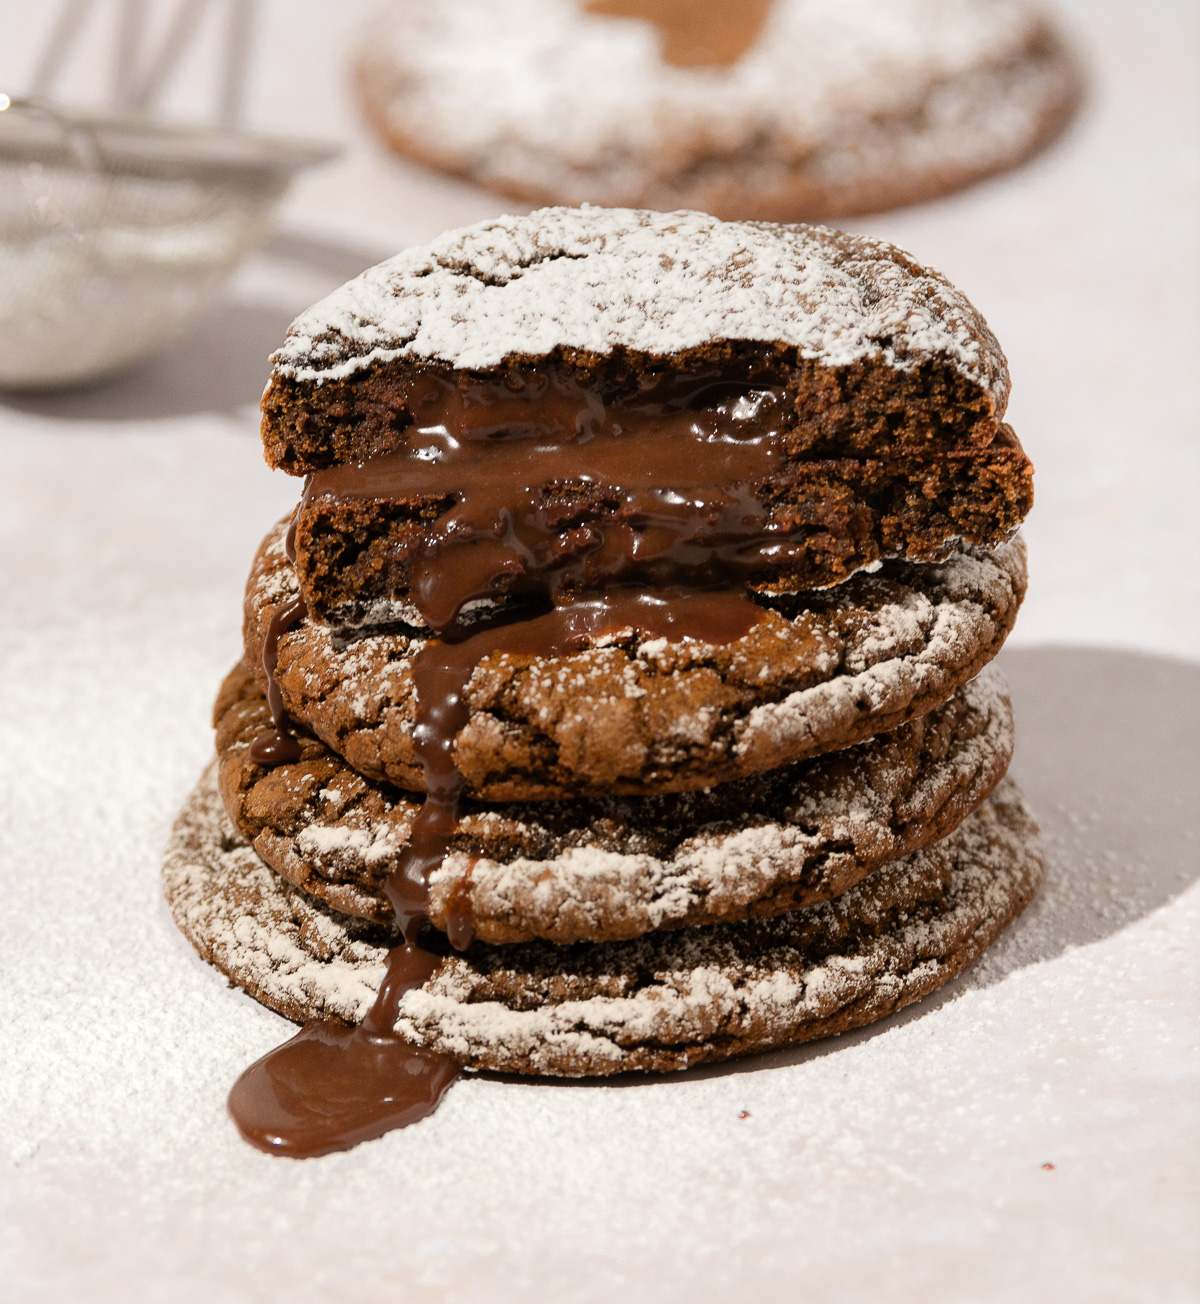
Mini marshmallows. A must for any s'mores recipe and it melts into the perfect gooey pocket.
Milk chocolate chunks. Chunks of chocolate chopped from a bar. Bar chocolate tends to have a higher content of cocoa butter than chips resulting in a gooier melt!
Cornstarch. Helps these cookies stay soft and chewy once they're cooled.
Sea salt. A sprinkle on top of each cookie before baking helps to balance the flavors of a cookie that would otherwise be cloyingly sweet
tips for the best brown butter s'mores cookies
Use a light colored pan when browning the butter. the browning process can happen very fast and you'll be depending on the visual cue of the milk solids' color change to decide when done. Using a light-colored pan ensures that you don't miss the window and end up with burnt butter instead.
Use marshmallow minis instead of fluff. Whole marshmallows are the perfect choice for this recipe since they're easier to handle and incorporate into the cookie dough than marshmallow fluff. The whole version of the treat also gives a sticky "pull" effect. Even once the cookies are cooled they'll be oozing marshmallows!
Don't chop the chocolate too finely. Having relatively large chunks will translate into equally sized pockets of oozing chocolate one baked. The smaller you chop the chocolate, the smaller these pockets will be
Use an oven thermometer. Oven temperature can make or break even the best recipe. This is especially true for cookies since the bake time is so short. Ovens can run hotter (or cooler) than the presented reading affecting the final texture of the cookie. Using an oven thermometer takes out the guess works and sets you up for success!
Don't place cookie dough on an already hot/warm pan. Placing the cookie dough on a warm pan will cause the cookies to spread more. You'll likely need 2 cookie sheets for this recipe due to the spacing guidelines. If you don't already, invest in a minimum of 2 sheet pans or large baking sheets that way you don't have to wait for the prior one to completely cool before baking your next batch.
Freeze baked cookies or pre-formed balls of dough for an on-hand snack!Vacuum seal with gentle pressure to avoid compressing the dough or cookie too much and to avoid frost bite! Enjoy within 3 months for optimal taste - especially for already baked cookies as it can start to take on other aromas from your freezer.
a note on any substitutions
Brown butter vs regular butter. Swapping in regular unsalted butter in this recipe will work but the cookies will be missing that ubiquitous warm flavor and may not be as soft. The amount will also be a little different since browned butter is more concentrated in fat. Be sure to use only 6 ounces of unsalted butter if making a swap and not 7 ounces. If you're nervous about making the browned butter alternatively you can toast 2 teaspoons of milk powder (non-fat is fine) and add it after melting the butter.
Chocolate chips vs chocolate chunks. This recipe calls for chunks chopped from a milk chocolate bar (I used Lindt). Chocolate bars have a higher amount of cocoa butter which melts at a lower temperature so the the pockets of chocolate in this recipe will likely still ooze once the cookie has cooled. Chocolate chips have added stabilizers that help them keep their shape and typically have less cocoa butter. Because of this, chocolate chips tend to stay solid even at a warmer temperature and are also more likely to "seize" while baking.
how to make the browned butter
The key to these cookies is the brown butter - it gives them a deep, caramel-like flavor similar to graham crackers used in classic s'mores so we can skip the need for actual graham cracker crumbs!
I like to keep some browned butter on hand and measure what I need directly from that supply. If you are making only the exact amount of browned butter for this recipe here's a step-by-step! Be sure to check out this detailed tutorial for some more tips and tricks!
Step 1. In a light colored pan over medium heat add the unsalted butter.
Browning butter reduces its water content - and weight (by about a quarter) so you'll need to account for that loss. Don't worry, I've done the math for you! This recipe calls for 5¼ ounces of brown butter; multiplying by 4/3 will give us our needed starting volume of unsalted butter - 7 ounces!
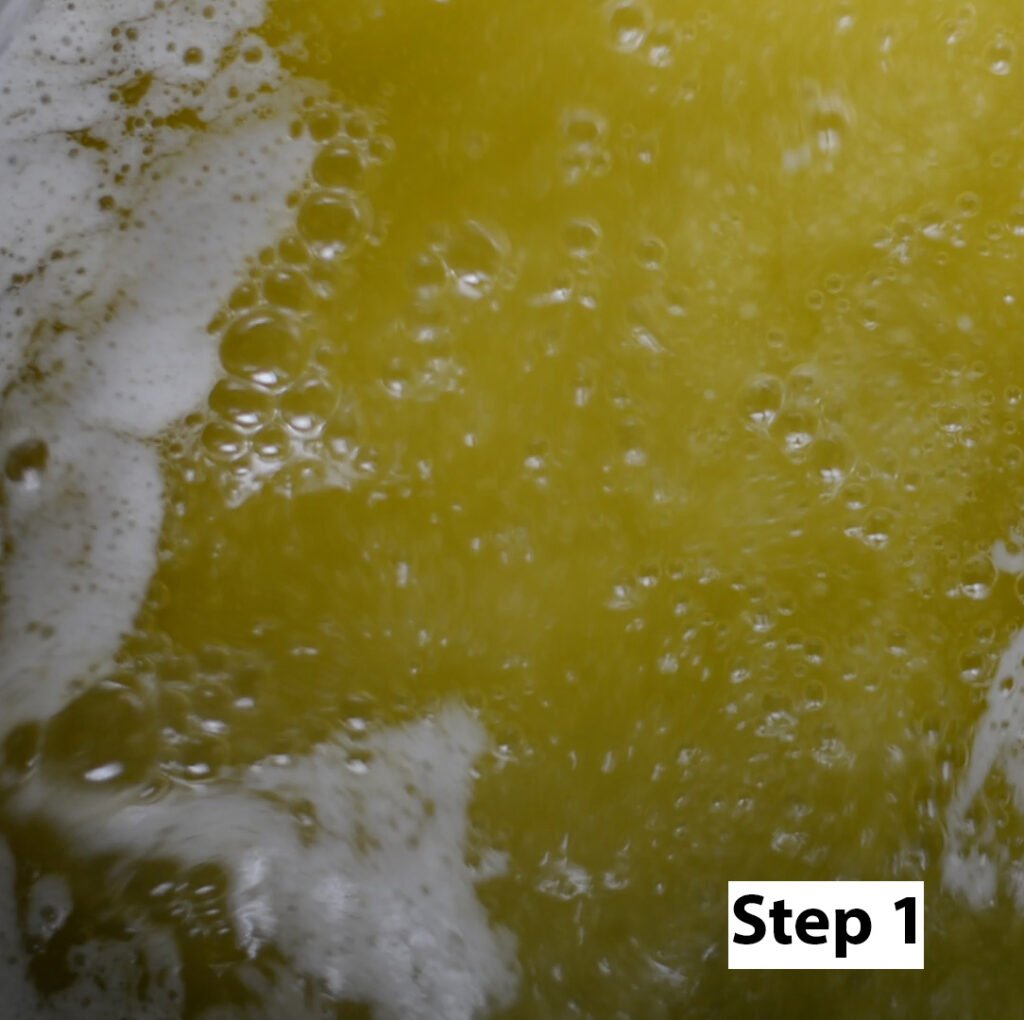
Step 2. Allow the butter to melt and stir constantly. Make sure to scrape the bottom of the pan to prevent the milk solids from sticking. Constant stirring will help you notice the color change once the butter is browned and ready. The butter may froth occasionally; this is normal.
Stuck milk solids will toast (and burn) much faster than the rest and impart an acrid flavor to the butter instead of a sweet one.
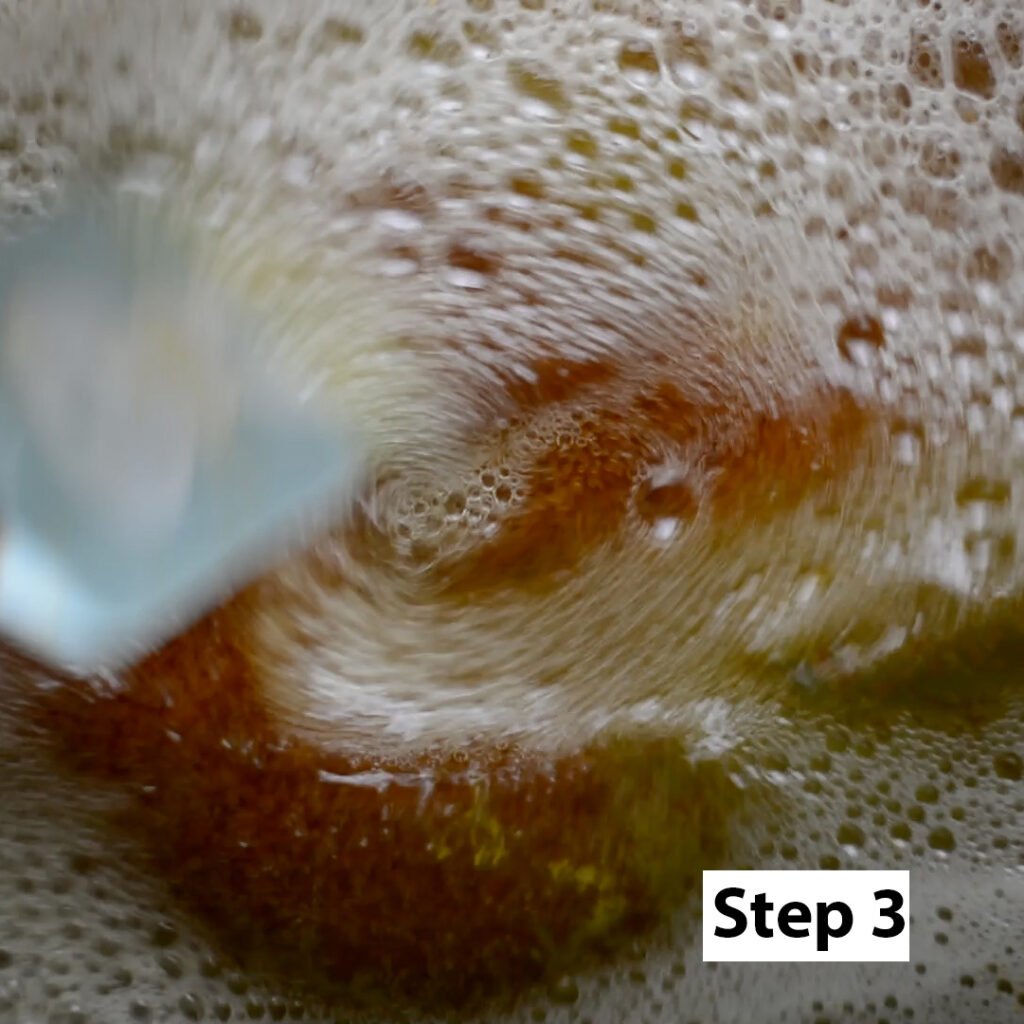
Step 3. Once the milk solids have toasted to a deep brown color remove the pan from the heat immediately and transfer to a heat proof bowl/container. Allow to cool before using in cookie dough. The butter should still be a liquid but not scalding. All other ingredients for the cookies should be at room temperature.
Tip: I like to pre-cool my bowl to further help the butter stop cooking and prevent burning. Only with a metal both bowl or container as the sudden change in temperature will cause any glass to break.
how to make the no chill brown butter s'mores cookies
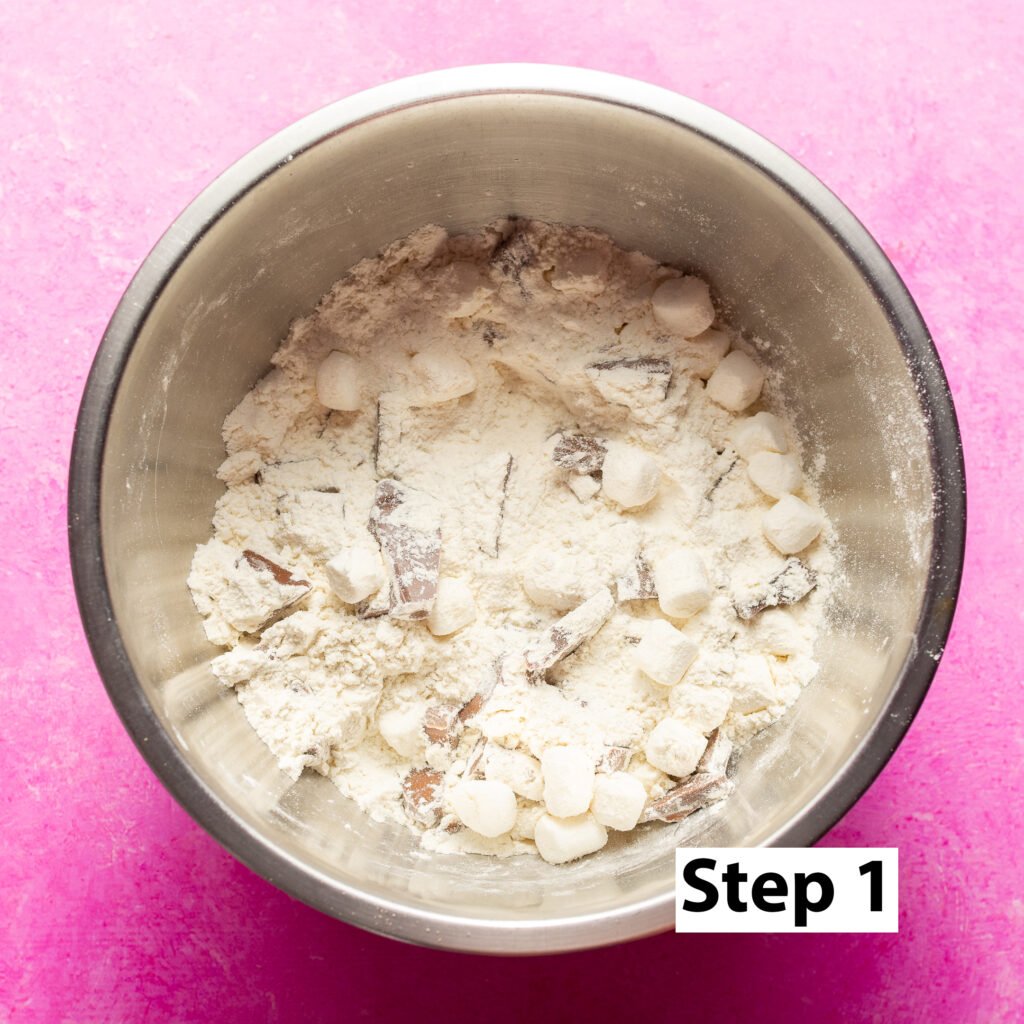
Step 1. Add all the all-purpose flour, chopped milk chocolate bar, mini marshmallows, cornstarch, baking soda & salt (not the sea salt) to a bowl. Mix and set aside.
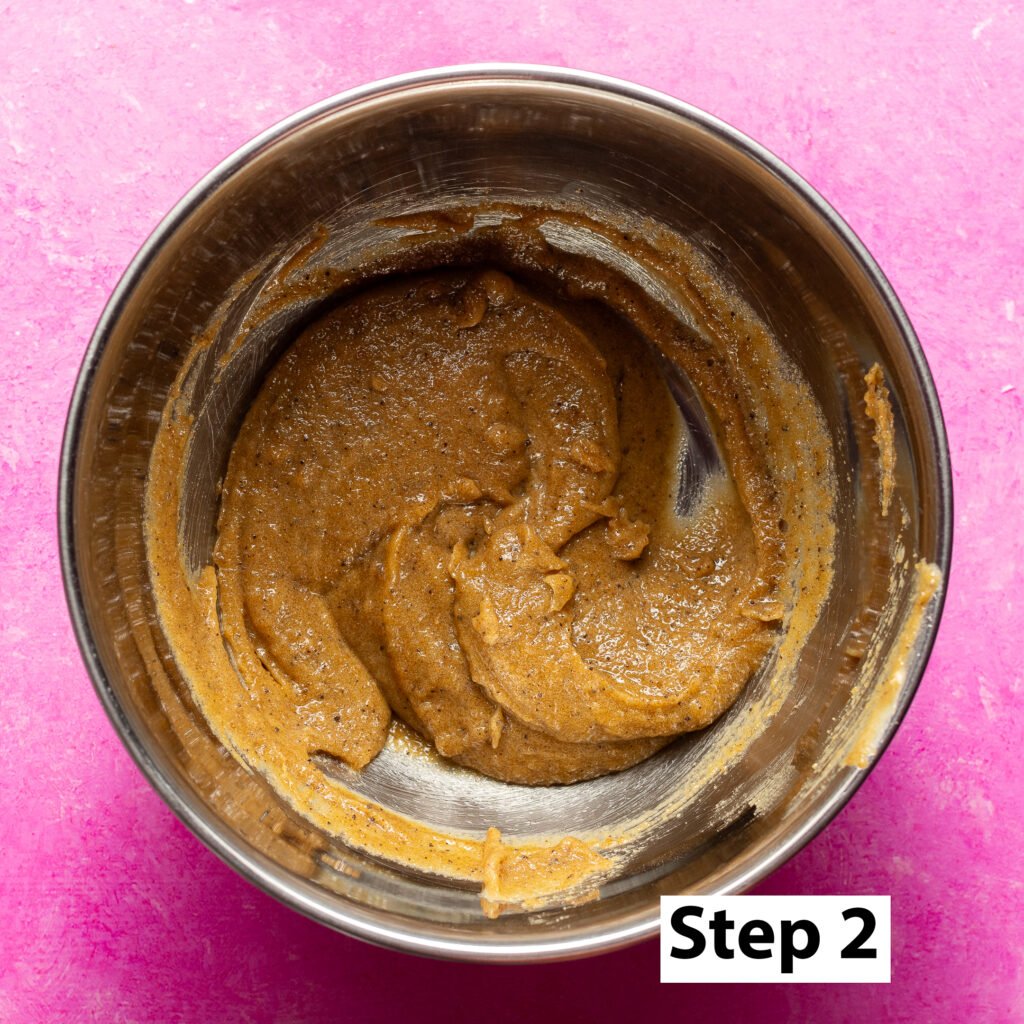
Step 2. Add the melted browned butter, dark brown sugar & vanilla extract to a mixing bowl (or the bowl of a stand mixer if using) and mix til smooth. The mixture may start to thicken - this is normal and happens because there is less water present in the mixture after browning the butter.
This recipe can be done by hand but if using a stand mixer, mix on low speed with a paddle attachment just until ingredients are combined.
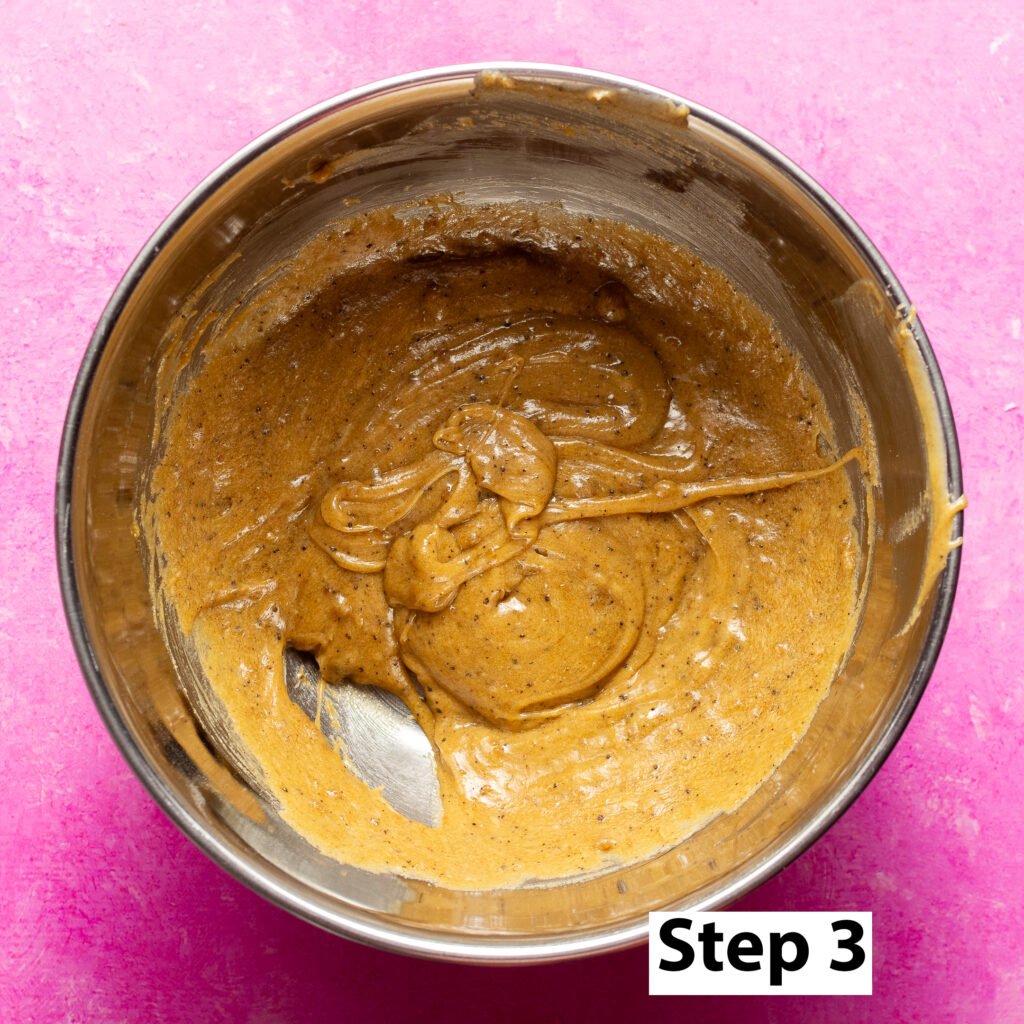
Step 3. Add the egg to the butter mixture and mix again til combined.
Step 4. Add the flour mixture of dry ingredients from step 1 and mix until there are no dry spots. Make sure you evenly disperse the chocolate and marshmallows so that each cookie has even amounts of each.
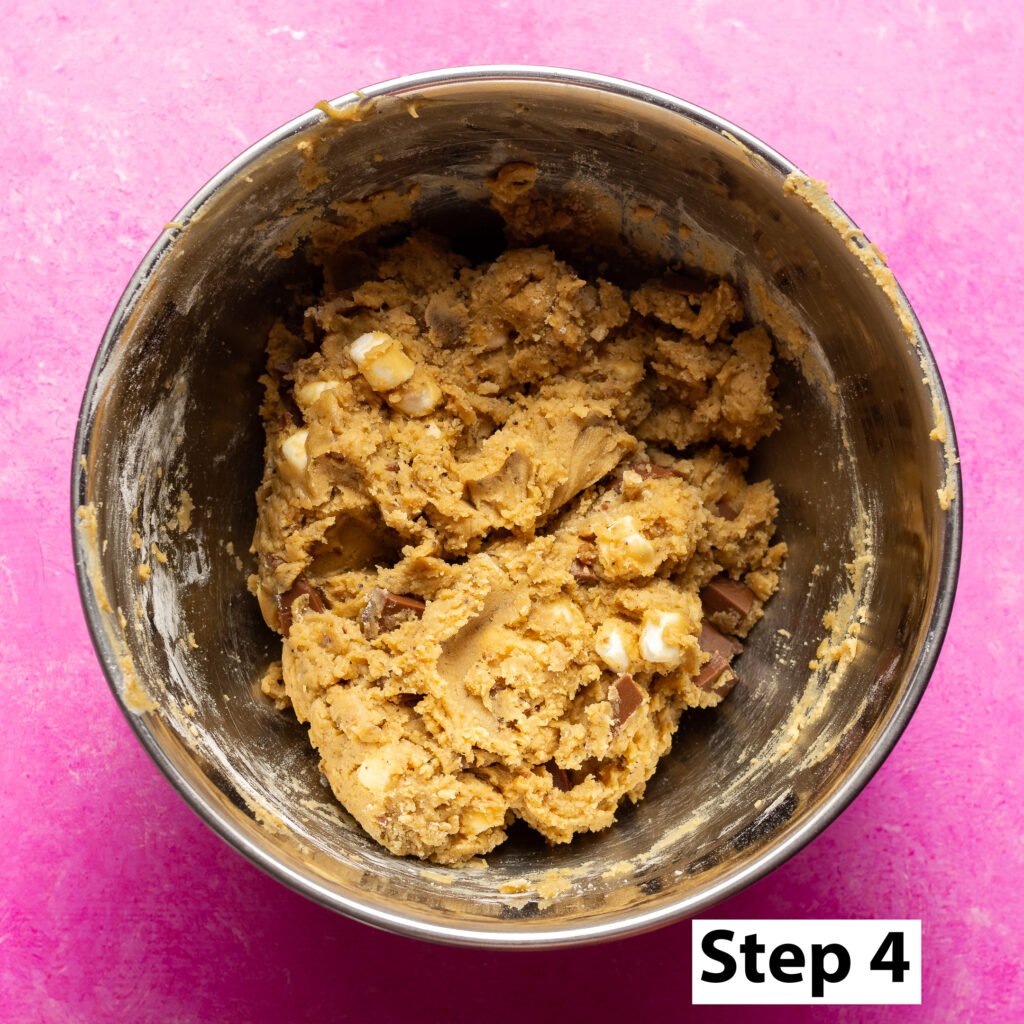
Step 5. Using a cookie scoop, portion out 10 balls of dough. Place dough onto a cookie sheet lined with parchment paper. Space them evenly leaving at least 2 inches of space around each to account for spreading during baking. Sprinkle sea salt on top of each before baking.
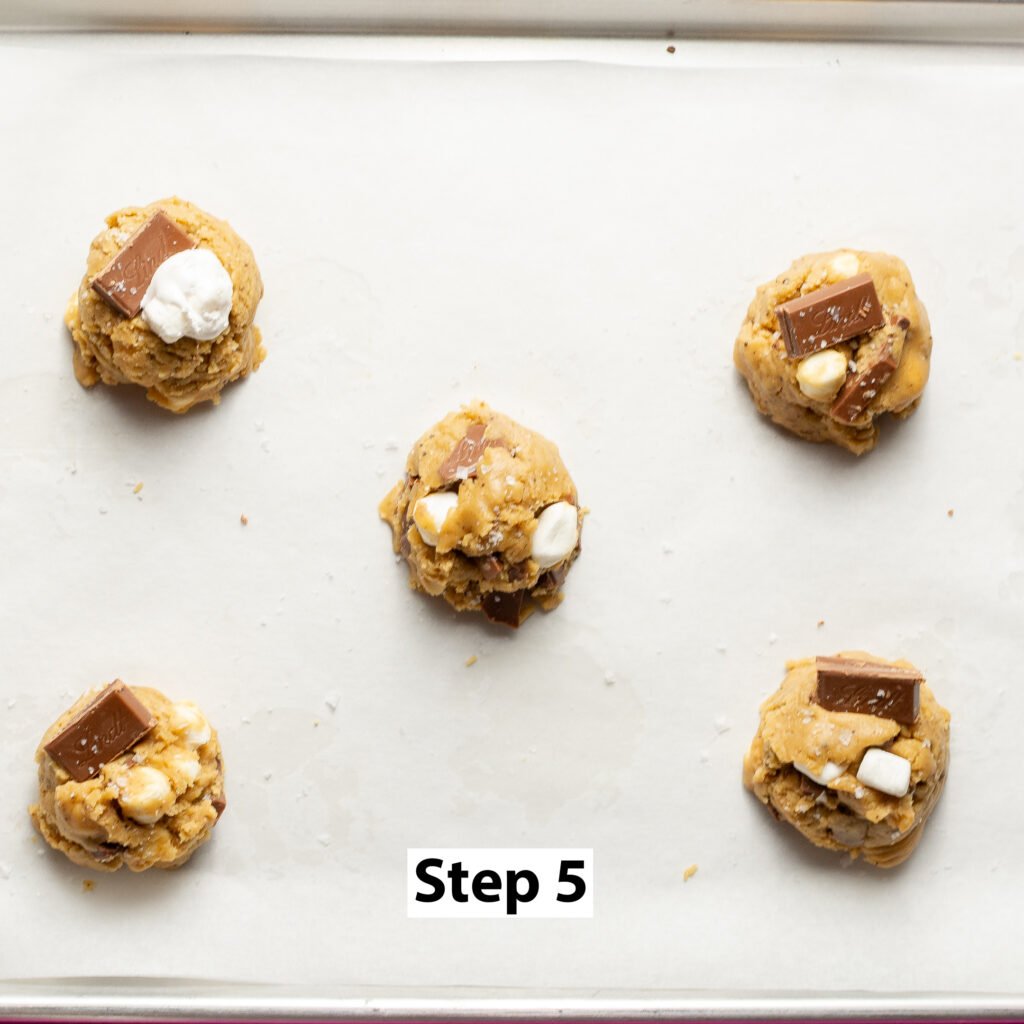
Step 6. Bake at 410°F for 8 minutes until golden brown. Allow to cool at least until the cookies can be comfortably handled.
Store in an airtight container and enjoy within 5 days for optimal texture!

No Chill Brown Butter S'mores Cookies
Ingredients
Equipment
Method
- In a light-colored pan over medium heat add 7 ounces of unsalted butter. The browning process reduces its water content and by the end we should have 5¼ ounces (the amount this s'mores cookie recipe calls for).
- Allow the butter to melt, stirring constantly and making sure to scrape the bottom of the pan to prevent the milk solids from sticking. The butter may froth occasionally; this is normal.
- Once the milk solids have toasted to a deep brown color remove the pan from heat immediately to prevent further browning and transfer to a heat proof bowl/container.
- Add the all-purpose flour, chopped milk chocolate, mini marshmallows, cornstarch, baking soda & salt (not the sea salt) to a bowl. Mix and set aside.
- Add the melted browned butter, dark brown sugar & vanilla extract to a mixing bowl (or the bowl of a stand mixer if using) and mix til smooth. The mixture may start to thicken - this is normal. If using a stand mixer, mix on low speed with a paddle attachment just until ingredients are combined.
- Add the egg to the butter mixture and mix again til combined.
- Add the flour mixture from step 1 and mix until there are no dry spots. Make sure you evenly disperse the chocolate and marshmallows so that each cookie has even amounts of each.
- Using a cookie or ice cream scoop, portion out 10 balls of dough and place dough onto a cookie sheet lined with parchment paper. Space them evenly leaving at least 2 inches of space around each.
- Sprinkle sea salt on top of each cookie then bake at 410°F for 8 minutes until golden brown. Allow to cool at least until the cookies can be comfortably handled.
- Store in an airtight container and enjoy within 4 days for optimal texture!
I never knew what love was until I had these cookies.......the best thing I've ever had!