
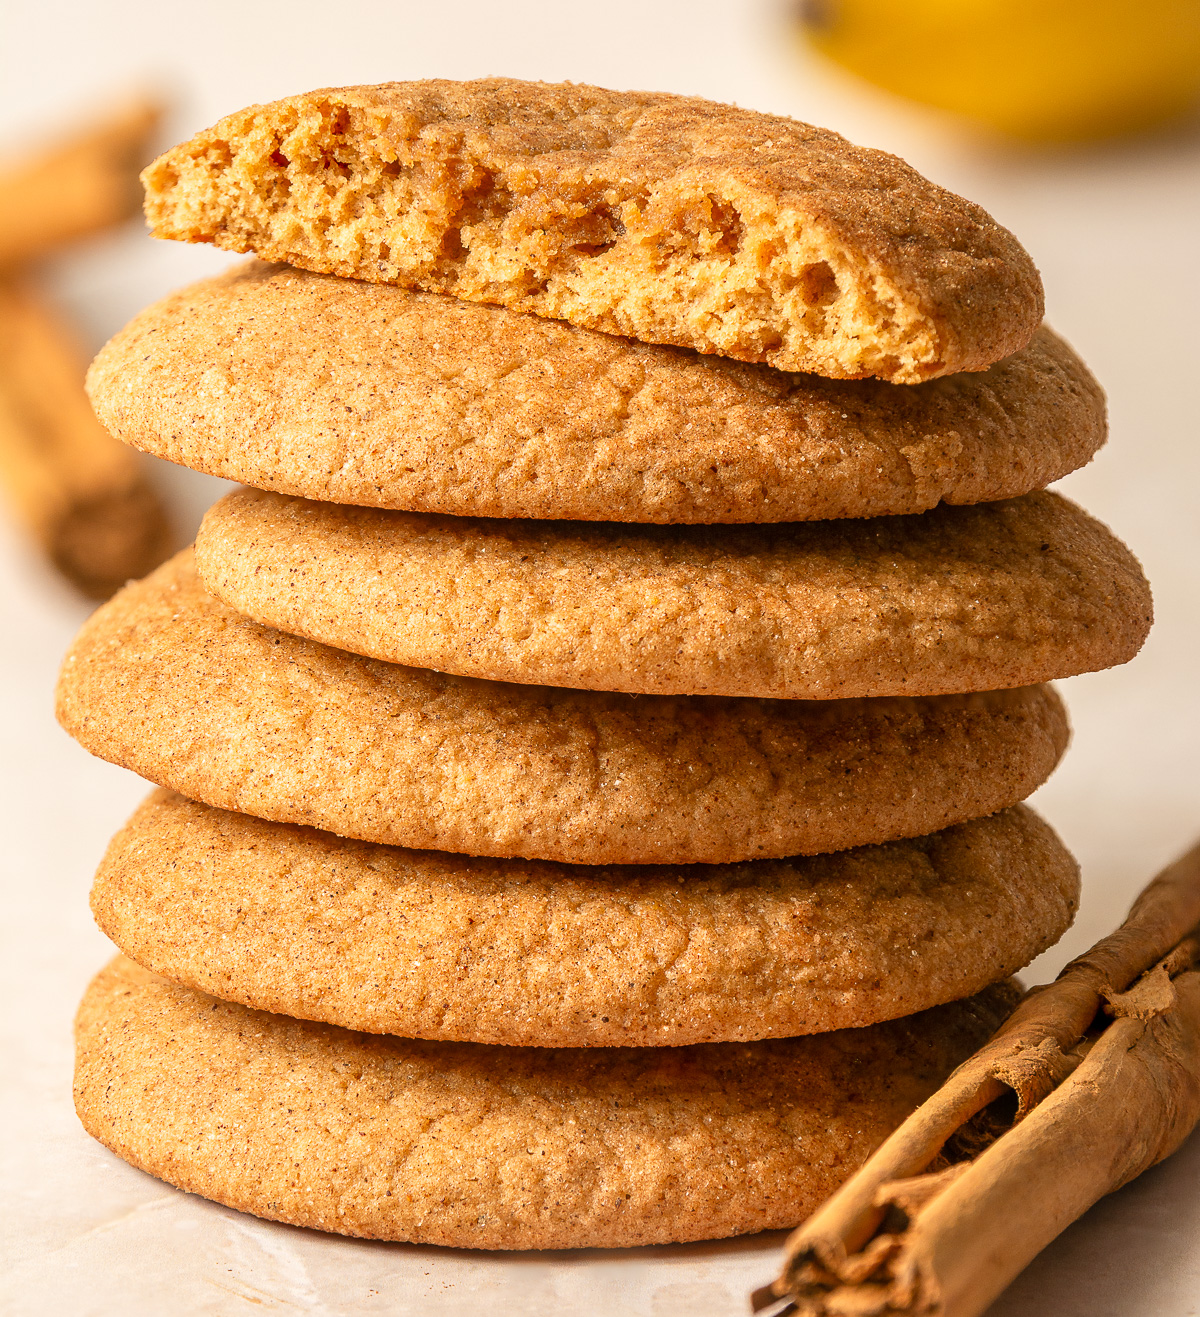
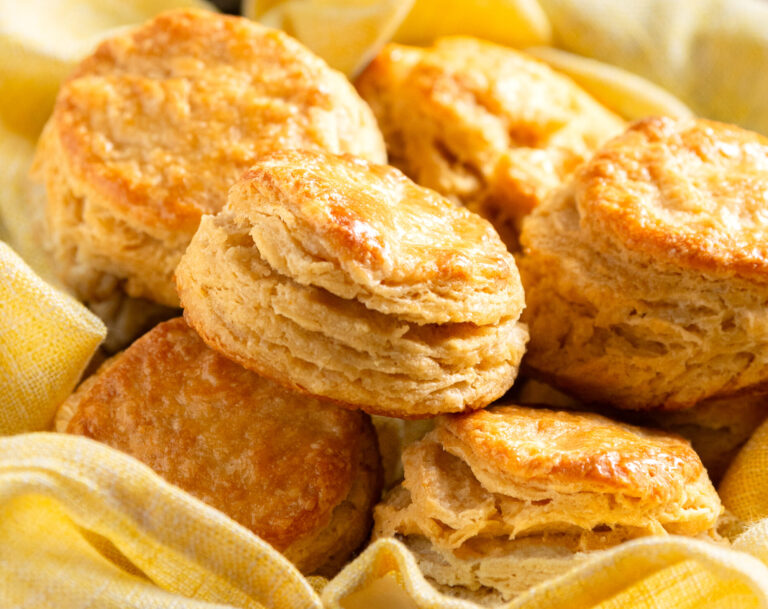
Brown Butter Banana Snickerdoodle Cookies
These brown butter banana snickerdoodle cookies are a holiday cookie box must-have. They've got the cozy sweet cinnamon flavor of regular snickerdoodles but with the deep, nutty flavor of browned butter and the twist of sweet banana flavor making them just a little fragrant but not too overpowering thanks to the cream of tartar.
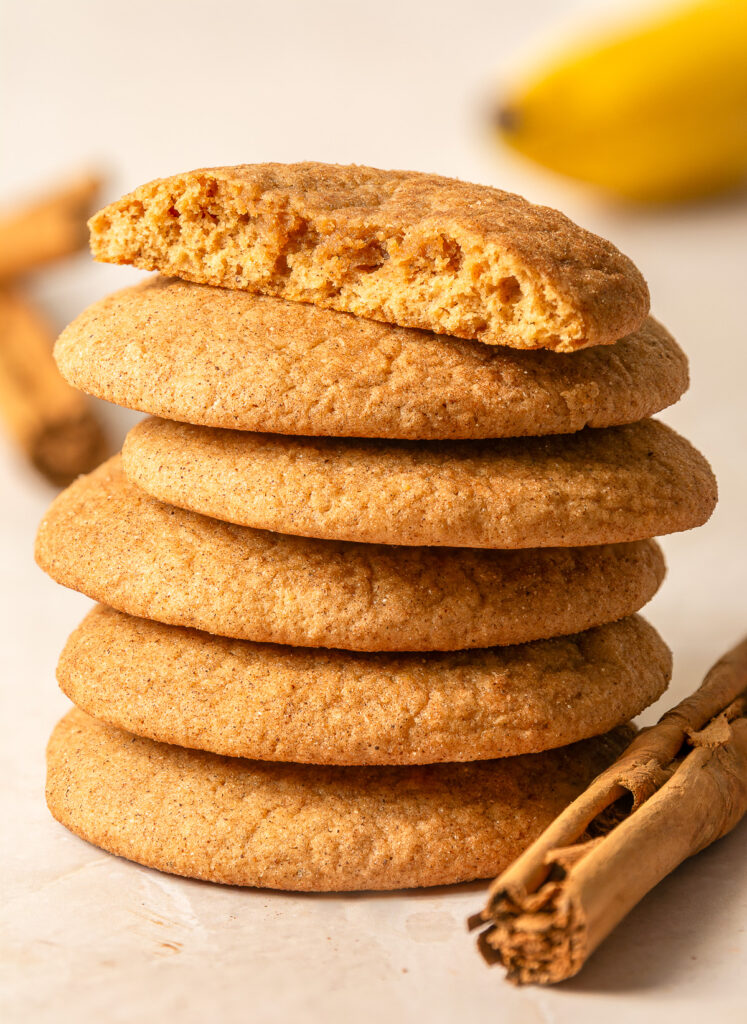
Best of all, these banana snickerdoodle cookies, like many of my other cookie recipes, don't require an electric mixer. Just mix (by hand), chill, and bake! No fuss required. Trust me when I say that this isn't just another variation floating around in the sea of snickerdoodle recipes. This one is the upgrade you didn't know you needed.
Pour yourself a cold glass of milk and watch how fast these disappear.
Key Ingredients

Bananas. Pick from a bunch of overripe bananas since these will be the most sweet and have the most intense banana flavor. The banana you chose should have some black or brown spots. The skin will also be thinner and the banana will feel much softer than a banana you usually snack on. A pureed banana incorporates smoothly into the cookie dough compared to a mashed banana that can have chunks. Avoid bananas that are completely black as these can have a fermented taste.
All-purpose flour. All-purpose flour has enough gluten to hold the cookies together which is especially important since the bananas thin the cookie batter.
Cake flour. Contrasts the all-purpose flour and gives the snickerdoodle cookies a tender texture
Sugar. A mix of granulated white sugar and brown sugar is used for this recipe. Brown sugar complements the warm flavors of these banana snickerdoodles and gives it a slightly chewy texture while the white sugar prevents too much spread during baking.
Unsalted butter. Brown the butter before using it for the cookie dough. Brown butter gives the snickerdoodle cookies a warmer flavor to complement the bananas and the cinnamon. During the browning process the water in the butter evaporates which is crucial in the dough becoming firmer when it chills.
Cream of tartar. Classic snickerdoodle cookies include cream of tartar which adds a subtle tart flavor and gives the cookies their soft, almost cake-like texture.
Cinnamon. Snickerdoodle cookies are classically cinnamon-flavored. Ground cinnamon blends in with the cookie dough perfectly and is also used in the cinnamon-sugar topping that the cookie dough is rolled in.
Tips for the Best Banana Snickerdoodle Cookies
Don't skip browning the butter! As the butter browns the water evaporates making the butter (and cookie dough) more firm when it is cooled. This is especially important since the pureed banana thins the cookie dough quite bit. Once the dough is chilled the browned butter helps the cookie dough to firm up so that it can be formed into a ball and rolled in the cinnamon-sugar topping.
Use an oven thermometer. This recipe like most of my other cookie recipes calls for a higher baking temperature. This is so the cookies bake faster which ultimately results in less spread and a softer cookie. Ovens can run hotter or cooler than the presented reading or have hotspots. An oven thermometer takes out the guess work to guarantee perfect banana snickerdoodle cookies!
Use a kitchen scale. Weighing your ingredients will give you the best and most consistent results. Particularly when measuring flour, scooping directly from the container this causes packing and results in using more than the amount called for. On the other hand, brown sugar is the opposite. Since it's not as fluid and granulated sugar it should be packed if you opt for a measuring cup but this measurement can vary from person to person.
Use a light-colored or stainless steel pan to brown the butter. This makes it much easier to visualize the extent to which the milk solids have browned. Using a dark pan, especially if you're a beginner increases the risk of burning the butter since you may not notice that the butter has finished browning. Dark & heavy pans, like cast iron also retain heat more effectively so the butter could burn as it continues to cook even once removed from the heat.
Frequently Asked Questions
What does cream of tartar do in snickerdoodle cookies? Cream of tartar adds a subtle tart flavor to the cookies and makes the texture almost cake-like. In the case of these banana snickerdoodle cookies the cream of tartar also balances the flavor of the banana a bit since banana can be a overpowering at times.
I know what you're thinking next, "Can I make snickerdoodle cookies without cream of tartar?" Not really, unfortunately without the cream of tartar snickerdoodle cookies would just be sugar cookies, or in this case, banana-flavored sugar cookies.
What flavor are snickerdoodles? Classic snickerdoodle cookies are a buttery cinnamon - flavored cookie with a subtle tart flavor and super soft texture. They are a classic cookie choice around the holidays - especially Christmas!
Can I save the browned butter if I burn it? Unfortunately, no. Burnt milk solids are beyond saving and will give an acrid flavor to the butter even if you strain the milk solids. If you burn the milk solids while browning the butter the best course of action is to start again with a fresh stick of butter and a clean pan. If you've never made browned butter don't fret! Check out this step-by-step guide on how to get the perfect browned butter!
More Banana Desserts!
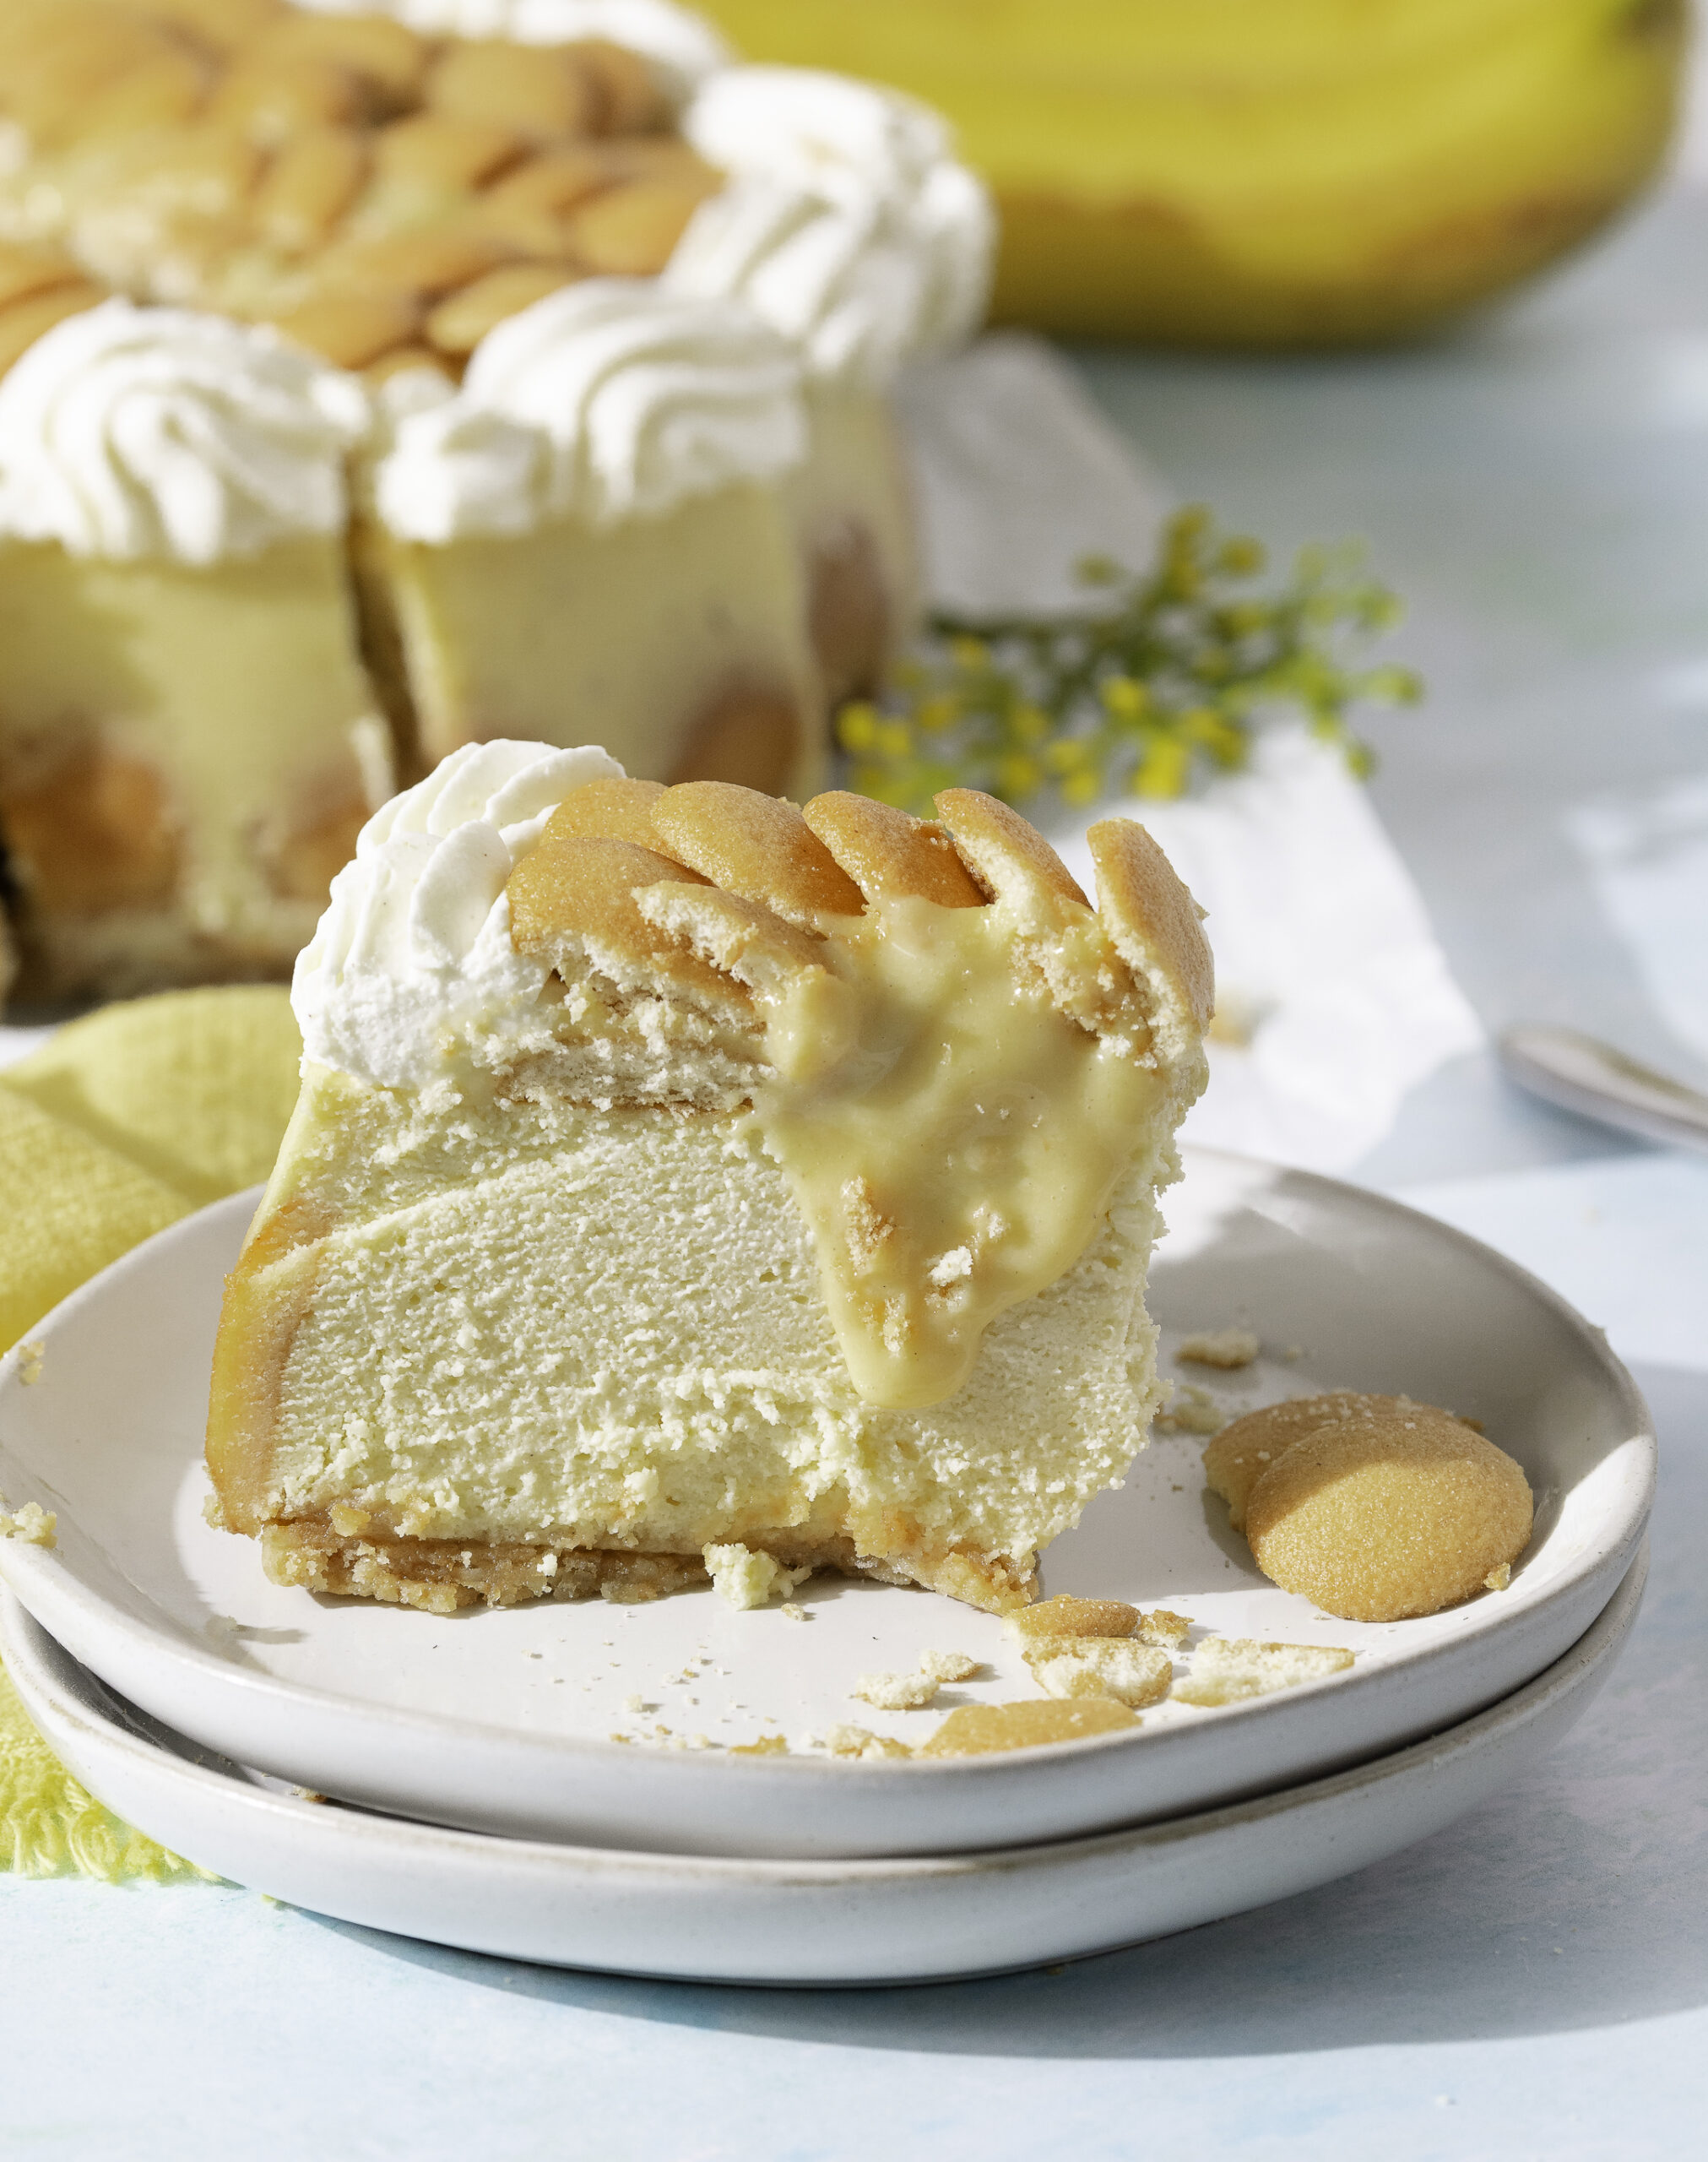
Baked Banana Pudding Cheesecake
Equipment
- 1 stand mixer with large bowl with whisk & flat beater attachment
- 1 small saucepan
- 1 piping bag with your choice of piping tip only needed if using stabilized whipped cream
- 1 9-inch springform pan a regular baking pan may be used but transfer will be trickier
- 1 large pan for water bath at least 2 inches larger than baking pan to allow for enough space
- 1 oven safe bag
- kitchen twine for securing oven bag to springform pan
Ingredients
Cheesecake Filling
- 32 oz cream cheese (4 blocks)
- 1 ¼ cups granulated sugar
- 5 large eggs separate 1 egg and set the yolk aside for the pudding topping
- ½ cup sour cream
- 1 medium banana, pureed very ripe
- 2 tablespoon all-purpose flour
- 3 tablespoon heavy cream
- 1 teaspoon vanilla extract
Cheesecake Crust
- 1½ cups vanilla wafer cookies, crushed (140g)
- 4 tablespoon granulated sugar
- 4½ tablespoon unsalted butter, melted
Banana Pudding Custard Topping
- 5 oz evaporated milk
- 1 large egg yolk from prior separated egg
- ¼ cup + 1TBSP granulated sugar
- 1 tablespoon all-purpose flour
- 1 medium banana
- vanilla wafer cookies for layering and arranging on top
Stabilized Whipped Cream (Optional)
- ½ cup heavy whipping cream
- ¼ cup confectioner's sugar
- ¾ teaspoon powdered gelatin
- 1 tablespoon cold water
Instructions
Vanilla Wafer Crust
- Mix all crust ingredients in a bowl until there are no dry spots then press into the bottom of springform pan in an even layer.
- Line whole vanilla wafers along the sides of the springform pan for a decorative effect.
- Prepare springform pan for the water bath by placing it in an oven bag and then using kitchen twine to secure the bag to the the top of the pan, sealing it and preventing any water from entering.
Cheesecake Filling
- Preheat your oven to 250℉
- Add cream cheese, granulated sugar and vanilla extract to the bowl of a stand mixer and beat until fluffy and smooth (about 2 minutes)
- Of the 5 eggs, separate one and set aside the yolk to use in the pudding topping
- After setting one egg yolk aside, add the rest of the eggs (4 whole and one egg white) to the mixing bowl and beat again until completely smooth making sure to scrape down the bottom of the bowl so that there are no lumps.
- Add the sour cream, pureed banana, heavy cream and all-purpose flour to the mixing bowl and beat again until incorporated.
- Pour the cheesecake filling into your prepared springform pan.
- Prepare a water bath by placing the springform pan into a larger, oven-safe pan allowing for at least 1-inch of space around. Pour hot water into the larger pan until halfway up the outside of the springform pan. Be careful not to spill any water in the springform pan.
- Bake the cheesecake in the water bath for 2 hours & 15 minutes at 250℉ or until it is set with a slight jiggle.
- Once done, turn the oven off and allow the cheesecake to rest in the oven until cool enough to handle or at room temperature
Banana Pudding Custard Topping
- Whisk evaporated milk, egg yolk (set aside from earlier), granulated sugar & all-purpose flour in a small saucepan until there are no lumps
- While whisking constantly to avoid lumps, heat over medium to medium-high heat until thickened. This should take 3-5 minutes
- Set aside until you are ready to assemble the cheesecake, covering with plastic wrap and pressing it to the surface to avoid a "skin" from forming
Optional Whipped Cream Topping
- Add the cold water to a small microwave-safe bowl and bloom the gelatin by sprinkling it on top of the water then allowing it to sit for 5 minutes.
- Microwave the gelatin until melted (about 10 seconds) then allow to cool for about 2-3minutes or until a drop is comfortable on the back of your hand
- Add heavy whipping cream & confectioner's sugar to the bowl of a stand mixer and whip on high speed until soft peaks form.
- Set mixer to high again and whip, drizzling in the melted gelatin. Continue to whip on high speed until stiff peaks form and whipped cream holds its' shape.
- Transfer to a piping bag with your choice of a piping tip and set aside for assembly.
Assembly
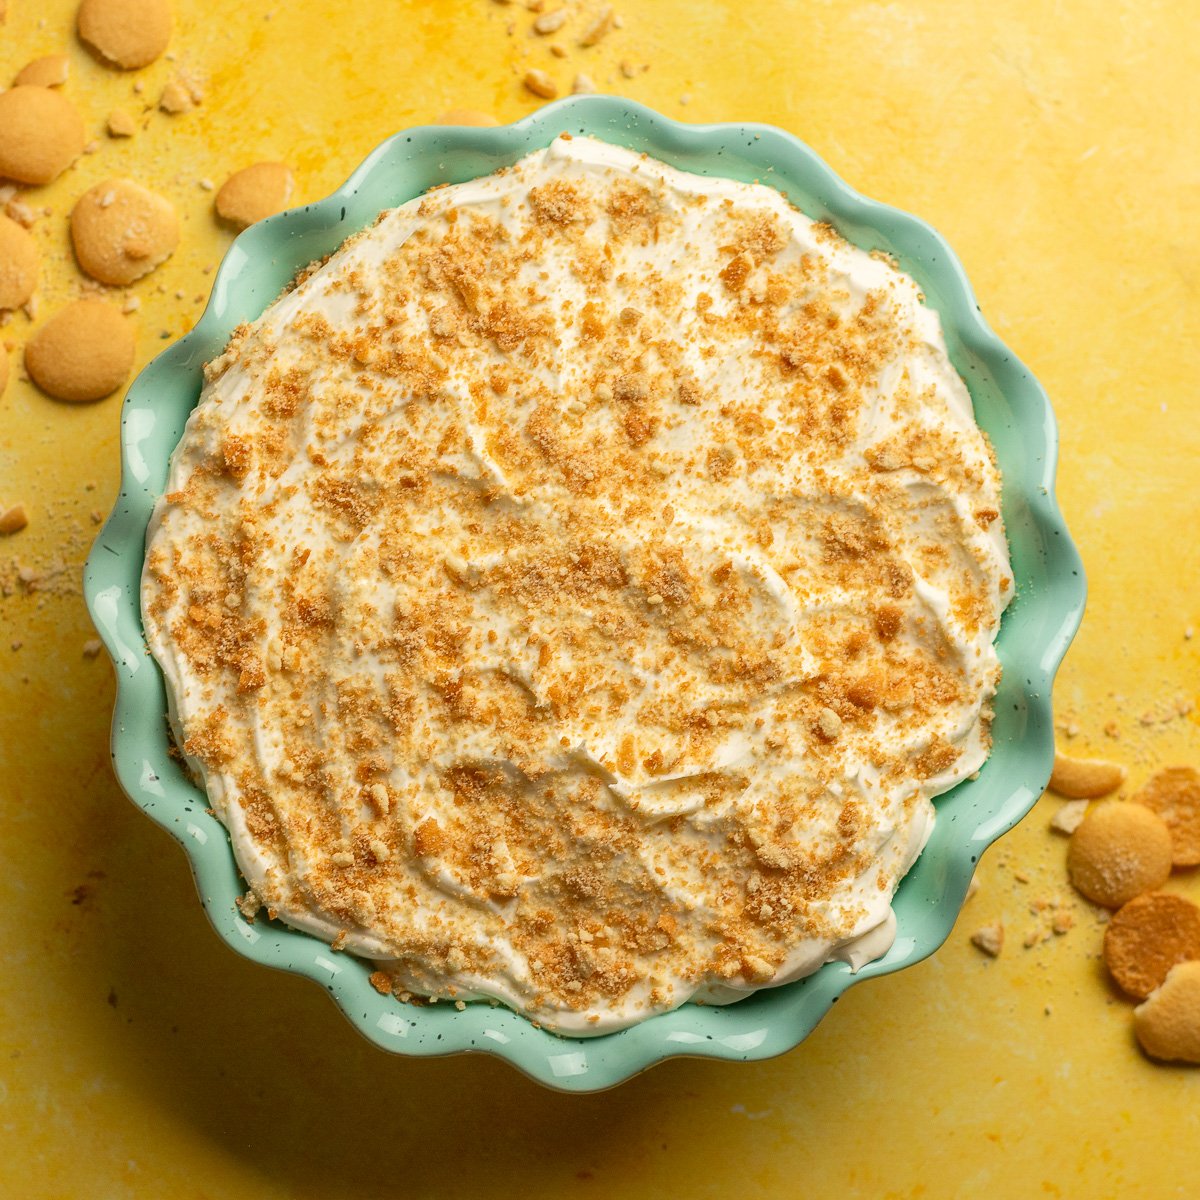
- If using whipped cream, pipe a border along the top of the cheesecake to act as a well.
- Start layering the banana pudding on top of the cheesecake, starting with vanilla wafer cookies then sliced bananas and pudding.
- Add a final layer of vanilla wafers on top then refrigerate for at least 6 hours (allowing the cheesecake to set and the cookies to soften) before serving.
Old-Fashioned Banana Pudding From Scratch
Equipment
- 1 medium saucepan
- 1 whisk
- 1 trifle bowl or pie/casserole dish with 32 oz capacity
- plastic wrap
Ingredients
For the Banana Pudding
- 680 mL evaporated milk
- 4 large egg yolks
- 35 grams all-purpose flour see post for substitutes
- 200 grams white, granulated sugar
- 3 medium ripe bananas with a couple spots
- one 11 oz box vanilla wafers or other desired cookies
- 1 teaspoon vanilla extract
- 1 teaspoon dark rum optional but highly recommended
Optional Whipped Cream
- 235 mL cold heavy whipping cream
- 170 grams confectioner's (powdered) sugar
Instructions
- Slice bananas (into ¼-3/8" slices) and set aside.It's best to layer the banana pudding while the custard is hot so slicing the bananas before starting helps the layering process go much more smoothly3 medium ripe bananas
- Add the evaporated milk, egg yolks, flour & sugar to a saucepan. Whisk until there are no more lumps of flour.680 mL evaporated milk, 4 large egg yolks, 35 grams all-purpose flour, 200 grams white, granulated sugar
- Whisk the evaporated milk/egg yolk mixture continuosly over medium to medium-high heat until thickened. Be sure to whisk along the bottom of the pan and to get the corners to avoid scorching or curdling the custard.When the custard is ready it will have a consistency similar to a thinner (or boxed mix) cake batter. Don't worry it thickens as it cools.
- Remove custard from heat and test for doneness. It should coat the back of a spatula and leave a clear trail with the swipe of a finger (as shown here).
- Add the vanilla and dark rum. Give a quick stir to incorporate1 teaspoon vanilla extract, 1 teaspoon dark rum
- Start layering the banana pudding by covering the bottom of your chosen dish with Nilla wafer cookies followed by a layer of scattered bananas then pouring a layer of the custard.one 11 oz box vanilla wafers
- Repeat this layering method until all custard is used then finish with a final layer of Nilla wafers.As the custard cools & thickens you may have to use a spatula to spread it in an even layer
- Crush a couple cookies and sprinkle on top to cover gaps left by whole Nilla wafer cookies. If topping with whipped cream you can skip this or do it after adding the whipped cream since this step is purely aesthetic.
- Cover with plastic wrap or lid and refrigerate for a minimum of 8 hours or preferably overnight to allow cookies to soften and for the banana flavor to permeate.
- Enjoy within 4-5 days refrigerating any leftovers in an airtight container.
Optional Whipped Cream Topping
- Add the cold whipped cream and confectioners' sugar to the bowl of a stand mixer affixed with a whisk attachment.235 mL cold heavy whipping cream, 170 grams confectioner's (powdered) sugar
- Whip on high speed until it forms firm peaks.
- Refrigerate the banana pudding for at least an hour before topping with the whipped cream so that it doesn't melt. You may also add the whipped cream right before serving.
Notes
- Use your favorite burner and cookware you're used to. Cookware that doesn't distribute heat the way you're used to or a burner on the stove that gets hotter than usual can throw things off quickly.
- Add whipped cream after the banana pudding has been in the fridge for at least an hour. If you plan to add more cookies on top, the earlier this is done, the better, since those will need time to soften.
- To fill a standard trifle dish, multiply this recipe by 1.5. To avoid manually calculating the amount for each ingredient to scale, click on the question mark (?) button (shown below) next to the word "Ingredients" and change the serving size to "15" (x1.5 of the original serving size). The recipe card should recalculate to give you scaled measurements.
Nutrition
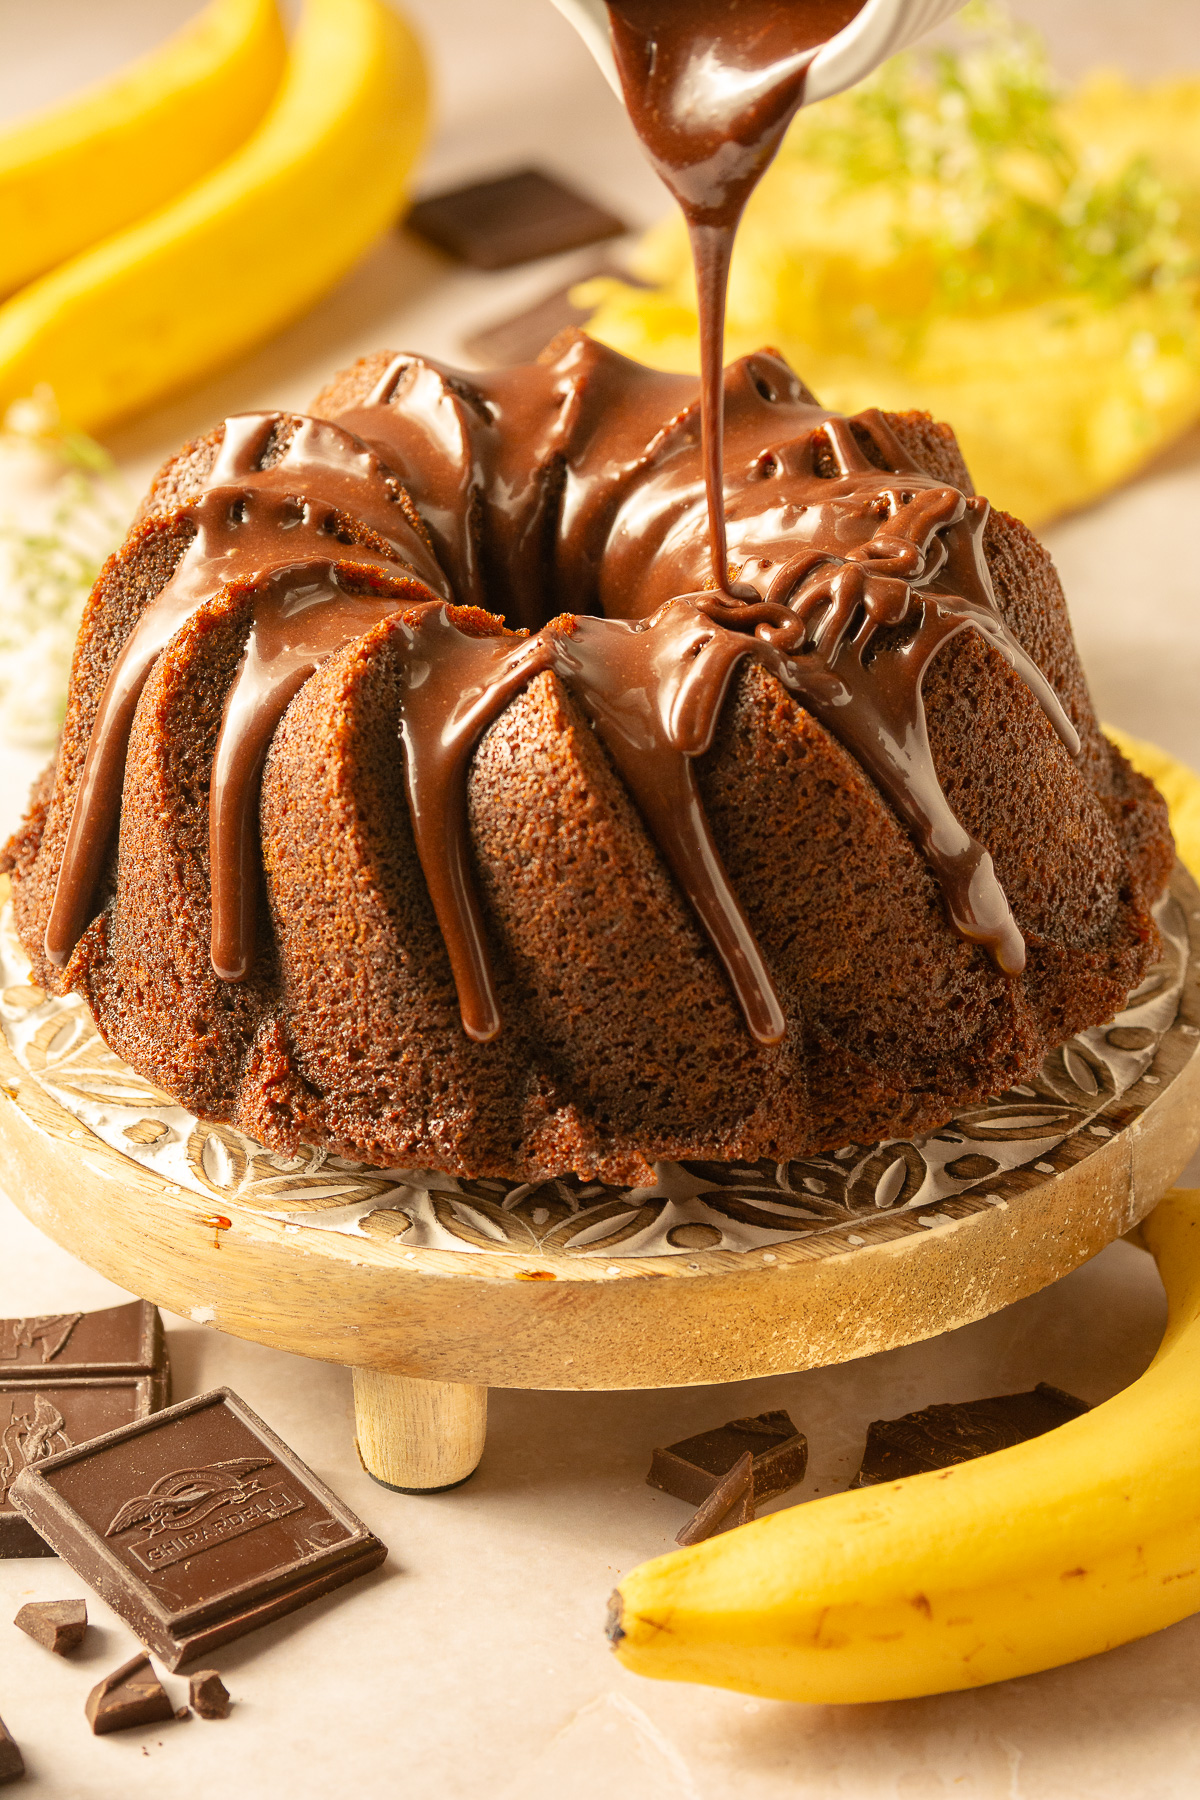
Chocolate Banana Marble Bundt Cake
Ingredients
For the Bundt Cake
- 170 grams ripe bananas, pureed 6 oz or ¾ cup or 2 medium bananas
- 30 grams regular unsweetened cocoa powder 1 oz or ¼ cup
- 240 grams all-purpose flour 8½ oz or 2 cups
- 340 grams dark brown sugar 12 oz or 1½ cups (packed)
- 4 large eggs
- 113 grams unsalted butter, melted 4 oz or ½ cup or 1 stick
- 90 grams sour cream 3⅛ oz or ⅓ cup
- 2 tablespoon vanilla extract
- 1 tablespoon baking powder
- 2 teaspoon baking soda
- 1 teaspoon salt
Optional Milk Chocolate Glaze
- 110 grams milk chocolate chips (or chocolate chunks) 3¾ oz
- 30 grams water 30 ml or 1 oz or 2 TBSP
Instructions
For the Bundt Cake
- Preheat oven to 350°F.
- In a small bowl add the all-purpose flour, baking soda, baking powder & salt. Mix to evenly incorporate & set aside.
- Add the eggs, brown sugar & vanilla extract to the large bowl of a stand mixer with a whisk attachment. Whip on high speed for 3-5 minutes until the mixture is pale, fluffy and ribbons on itself.
- With the mixer still going at high speed add in the sour cream & melted butter. The eggs will deflate a bit. This is fine.
- Turn the mixer down the low speed and spoon in the flour mixture from earlier. Add about a ¼ cup at a time, waiting until the last addition has completely mixed in before adding another. Stop the mixer half-way through to scrape down the sides and ensure the flour mixture doesn't collect along the sides of the bowl.
- Pour half of the batter in a separate bowl. Add the unsweetened cocoa powder to one half of the batter and the pureed bananas to the other half. Gently fold each add-in until completely incorporated.
- Prepare a 10-cup bundt cake pan with baking spray. Dollop the cake batter around the prepared bundt pan, alternating between the banana cake batter and the chocolate cake batter. Repeat until all the batter has been used.
- Using a skewer, swirl the batter being sure to get all the way to the bottom of the bundt pan so both the banana and chocolate cake batter are swirled throughout the cake.
- Bake the chocolate banana marble bundt cake for 35-40 minutes or until the cake cake springs back when pressed gently.
- Allow the cake to cool in an upright position until the pan is comfortable to touch bare-handed. Once you can touch the pan, flip the bundt cake onto a wire rack or your desired serving plate while it is still a little warm. The cake will release a lot more easily at this stage. Once released, leave the pan in place on top of the cake to avoid the bundt cake drying out while it cools. With the cake released there should be enough room between the cake and the pan to avoid it sticking to the pan again.
- Dust with confectioner's sugar if desired and serve once cooled. Store any leftovers in an airtight container.
Make the Optional Chocolate Glaze
- Add the water and milk chocolate chips to a microwave-safe bowl and microwave in 15-20 second increments, stirring until the chocolate is completely melted.
- Alternatively you can melt the chocolate over a double boiler.
- Pour the warm chocolate glaze onto a cooled cake and store in an airtight container or cake dome until ready to serve. This cake does not have to be refrigerated.
Notes
- Use room temperature ingredients.
- Pureeing the bananas in a blender is the best way for a smooth batter. Avoid simply using mashed bananas as this can be chunky and result in an inconsistent texture in the final bundt cake.
- Use a kitchen scale for best results. Measurements are provided in cups but these are estimates. If using cups, spoon the flour into the measuring cups and level with a knife. For the brown sugar, since it is not a fluid as white sugar this should be packed.
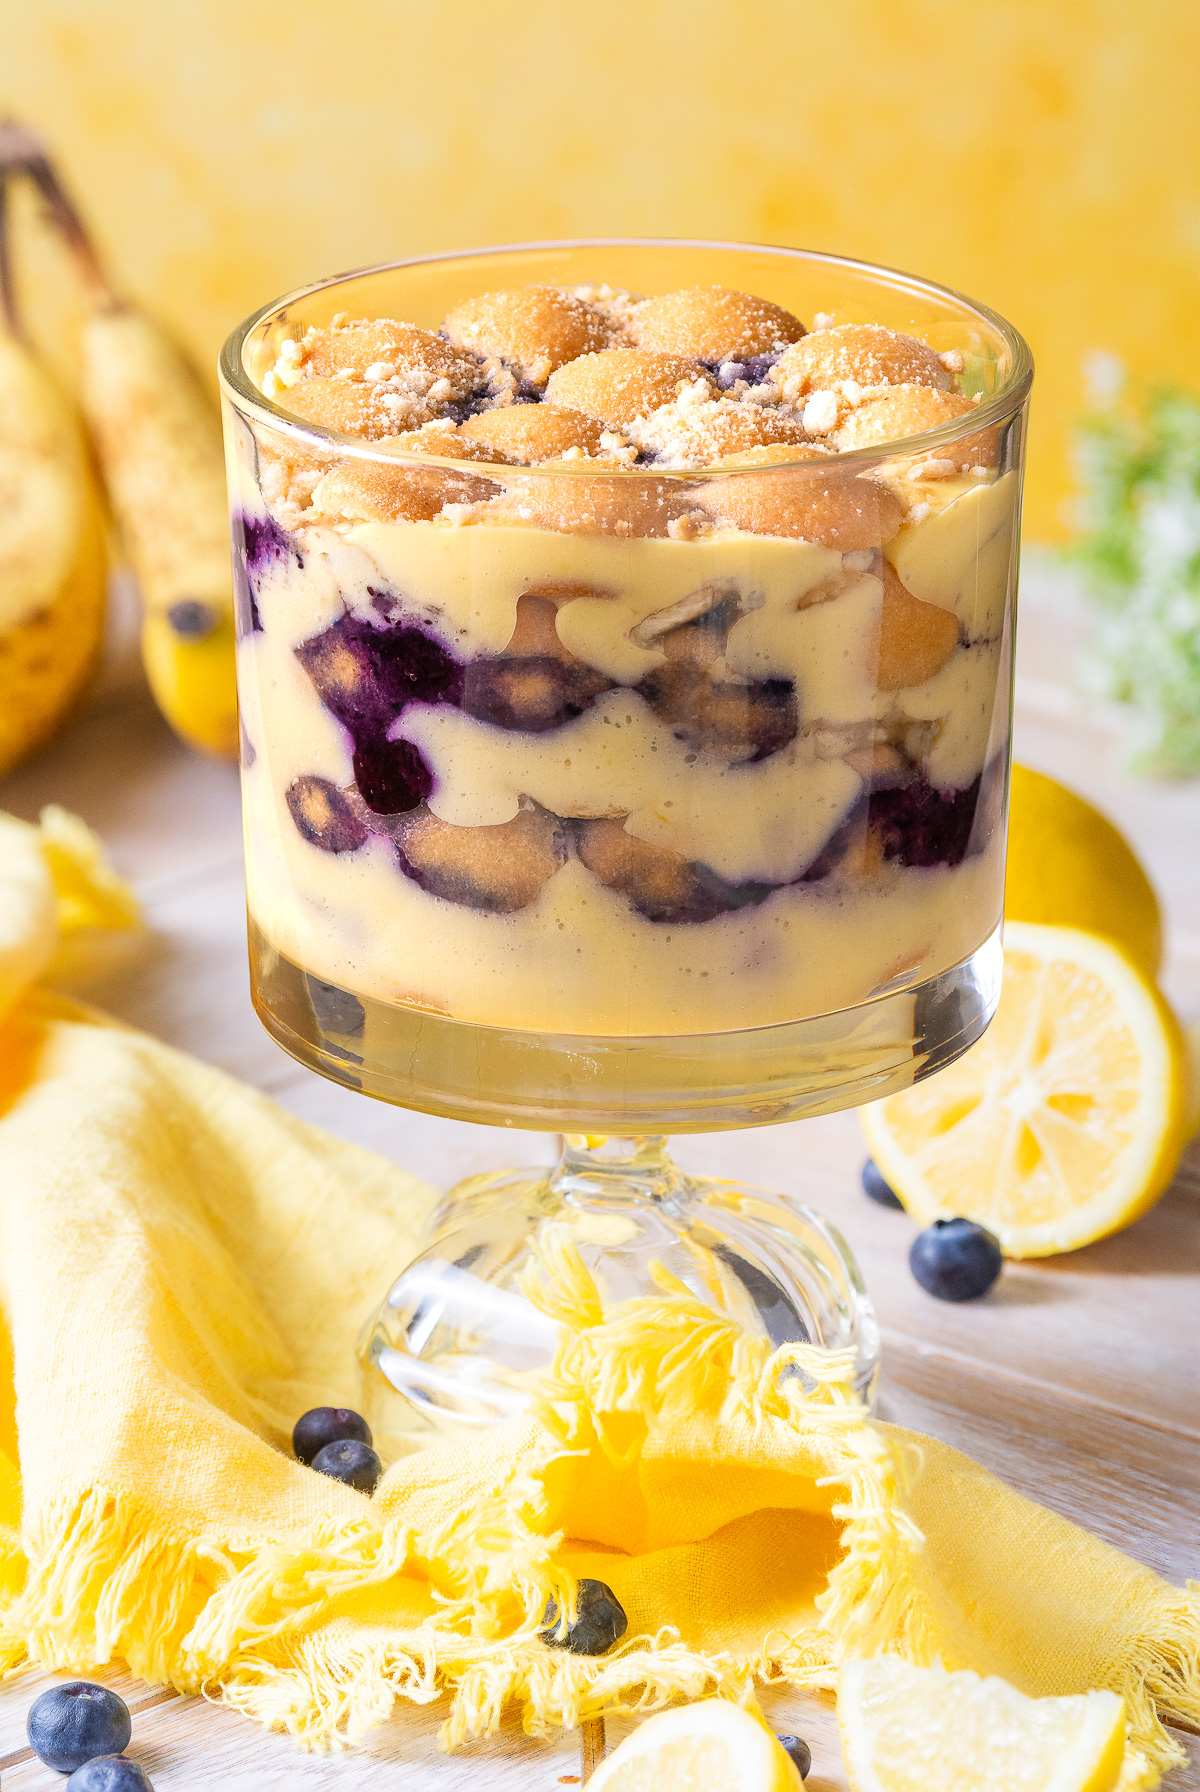
Blueberry Lemon Banana Pudding
Equipment
- trifle dish or other heat-safe container
Ingredients
for the Pudding and Add-Ins
- 1 large banana overripe
- ½ large lemon zest only
- 354 mL evaporated milk
- 100 grams granulated sugar
- 2 large egg yolks
- 18 grams all-purpose flour
- 1 eleven-ounce box Nilla wafer cookies
for the Blueberry Compote
- 355 grams blueberries
- 18 grams granulated sugar
- ½ large lemon zest only
Instructions
Make the Blueberry Compote
- Add the blueberries, sugar and lemon zest from half of the lemon to a saucepan and stir to incorporate. Crush about half of the blueberries with a spoon or potato masher.355 grams blueberries, 18 grams granulated sugar, ½ large lemon
- Cover and reduce over medium heat for 5-7 minutes. The consistency should be like a chunky blueberry syrup. Set aside until time to assemble the lemon-blueberry banana pudding.
Make the Lemon Pudding
- Add the lemon zest from the other half of the lemon and the granulated sugar to a medium saucepan. Rub the zest into the sugar until the mixture resembles kinetic sand. This should only take about 1-2 minutes.½ large lemon, 100 grams granulated sugar
- Add the evaporated milk, egg yolks & all-purpose flour to the lemon zest/sugar mixture. Using a ballon whisk, stir the ingredients to remove any lumps.354 mL evaporated milk, 2 large egg yolks, 18 grams all-purpose flour
- Continue whisking over medium heat (or up to medium-high heat) until the custard coats a spatula well (as shown here). This takes me about 10 minutes.
- While it's still hot, use the lemon pudding to assemble the lemon-blueberry banana pudding.
Assembling the Blueberry-Lemon Banana Pudding
- Slice the bananas to about ⅛ of an inch thickness and set aside along with the other ingredients.1 large banana
- Arrange a layer of vanilla wafers along the bottom of your dish followed by a scattered layer of the sliced bananas on top of the cookies.1 eleven-ounce box Nilla wafer cookies
- Carefully pour a layer of the lemon custard on top of the bananas - just enough to completely cover them. Use a spatula to evenly spread the custard as needed. As the custard cools it will start to thicken. This is normal, but you should work quickly.
- Add another layer of vanilla wafer cookies followed by a couple dollops of the blueberry compote made earlier.
- Repeat this layering process (Nilla wafers then bananas then lemon pudding then blueberry compote)until all the custard and blueberry compote is used up.
- Finish with a final layer of vanilla wafer cookies, crushing a couple of cookies to sprinkle on top to cover any gaps between the whole cookies.
- Cover with a lid or plastic wrap and refrigerate for at least 8 hours (preferably overnight) to allow the cookies to soften and the flavors to permeate.
- Enjoy within 4-5 days for optimal texture and flavor.
Notes
- Don't stop whisking! Constantly moving the custard ensures that the heat is evenly distributed and prevents the custard from curdling.
- Use your favorite burner and cookware you're used to. Cookware that doesn't distribute heat the way you're used to or a burner on the stove that gets hotter than usual can throw things off quickly.
Nutrition
How to Make these Brown Butter Banana Snickerdoodle Cookies
Brown the Butter
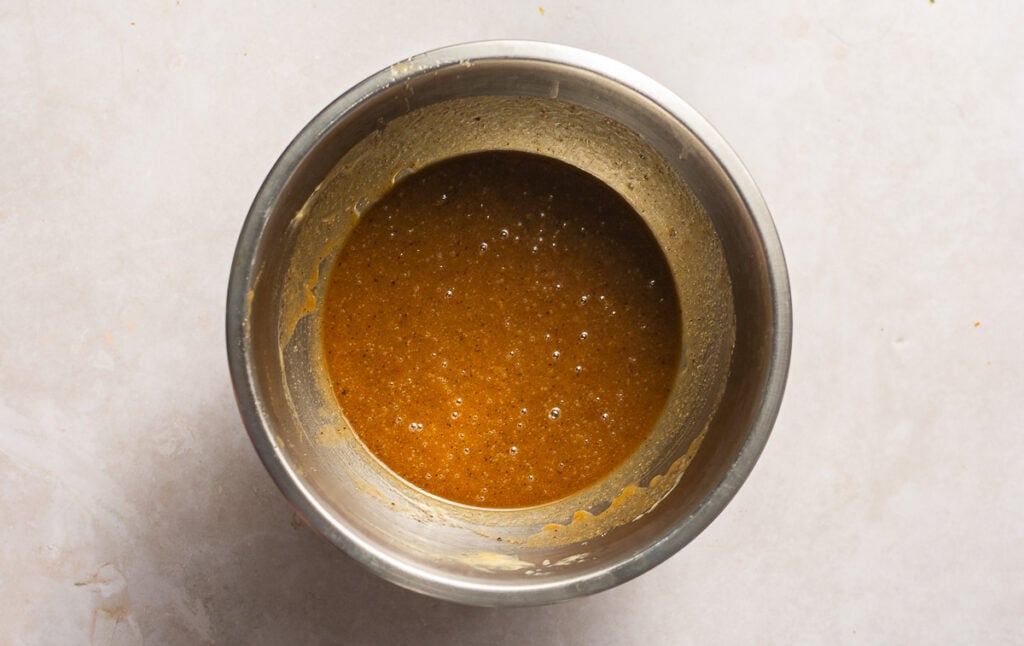
Step 1. Melt the butter over medium heat and allow the milk solids to toast until brown. Stir constantly with a spatula, scraping the bottom of the pan so the milk solids don't burn. The butter will sputter at first as the water separates from the fat. Once the sputtering slows, keep a sharp eye on the butter as this means all the water has evaporated and the butter should be about ready.
If you are hearing impaired, you will need to rely completely on sight which is totally fine. First, use a light-colored or stainless steel pan and again, be sure to stir constantly. Since the butter will foam, stirring will help you visualize the color of the milk solids.
Check out this detailed step-by-step guide for more tips & tricks for perfect browned butter!
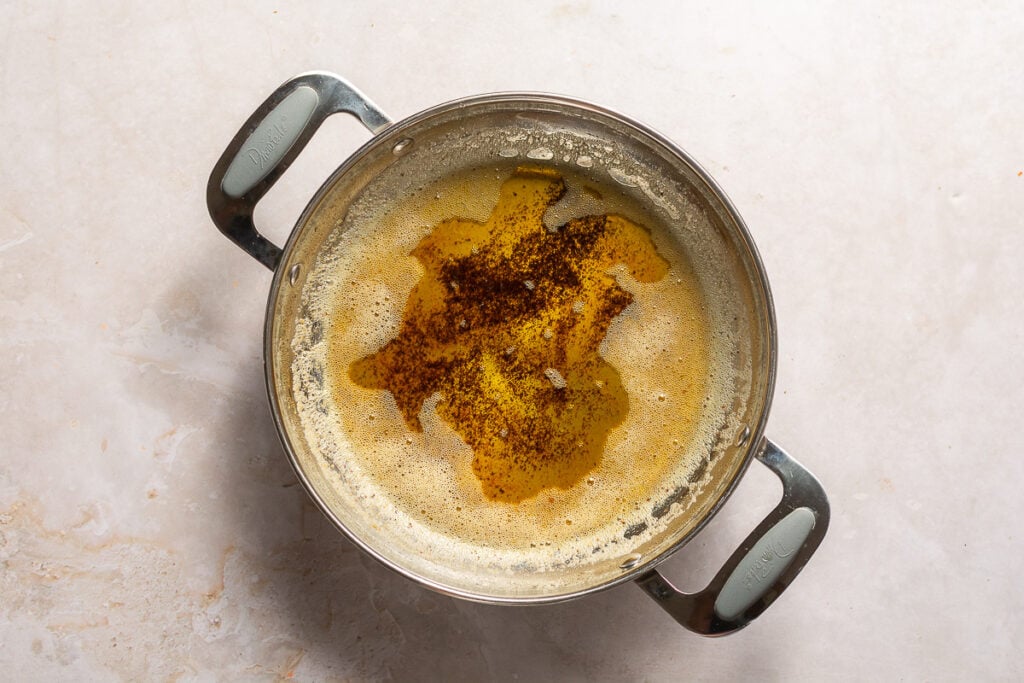
Step 2. Once the milk solids have reached a deep brown color remove the browned butter from the heat immediately and pour it into your mixing bowl. This will reduce the heat and prevent the butter from continuing to cook and burning.
Make the Cookies
Step 1. Preheat the oven to 400°F
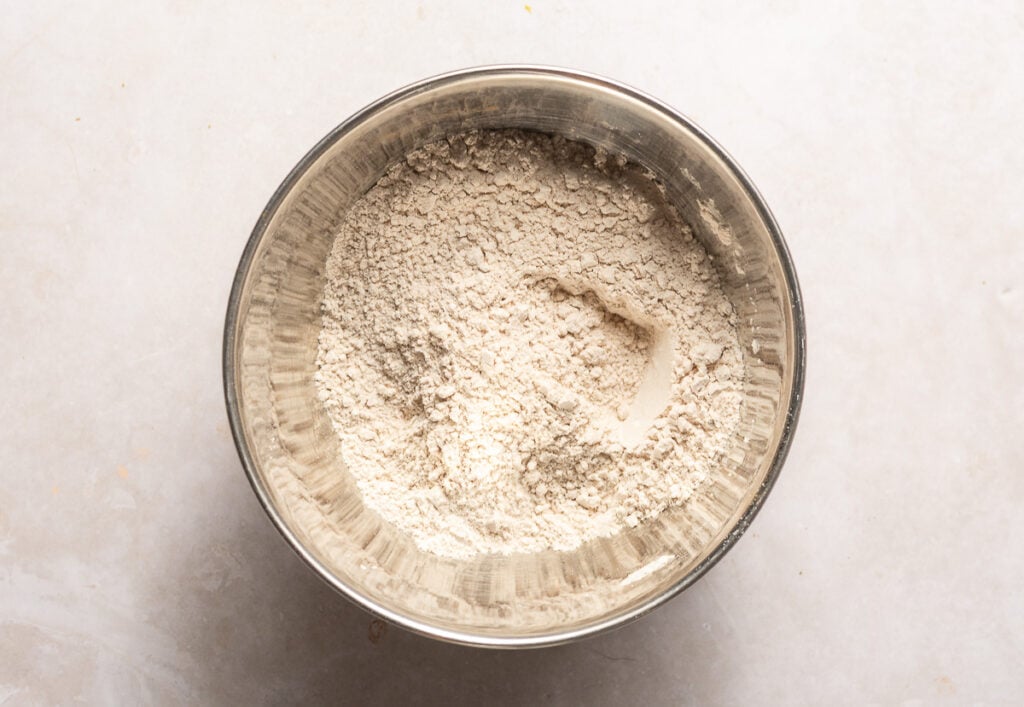
Step 2. Mix the all-purpose flour, cake flour, ground cinnamon, cream of tartar, baking soda and salt in a separate bowl. Set the flour mixture aside.
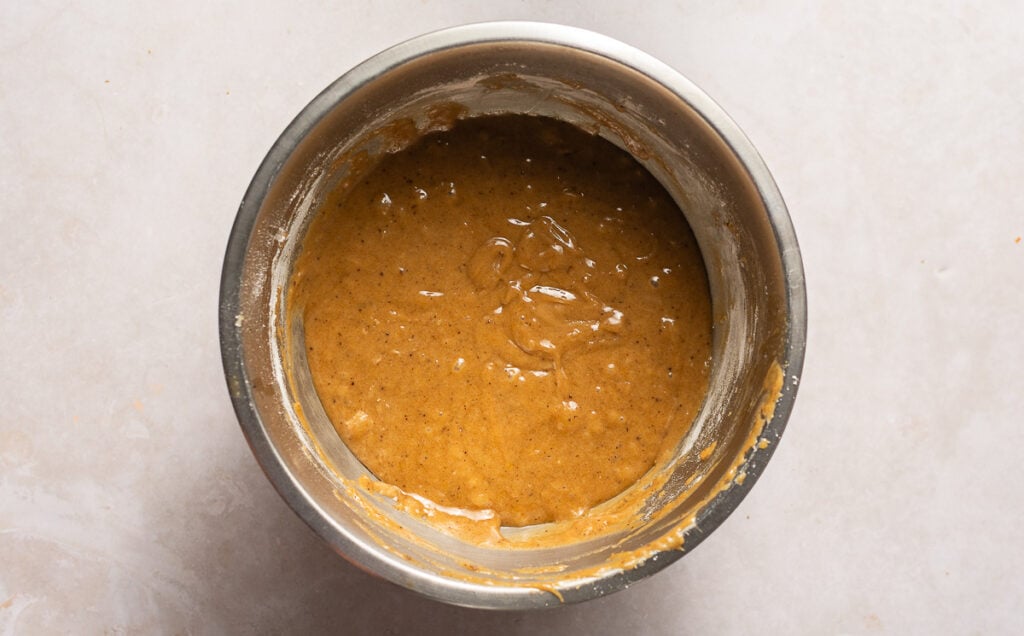
Step 3. Add the dark brown sugar, granulated sugar and vanilla extract to the bowl of browned butter and mix with a spatula until it forms a homogenous mixture.
Step 4. Add the egg and the pureed banana and mix again until completely smooth.
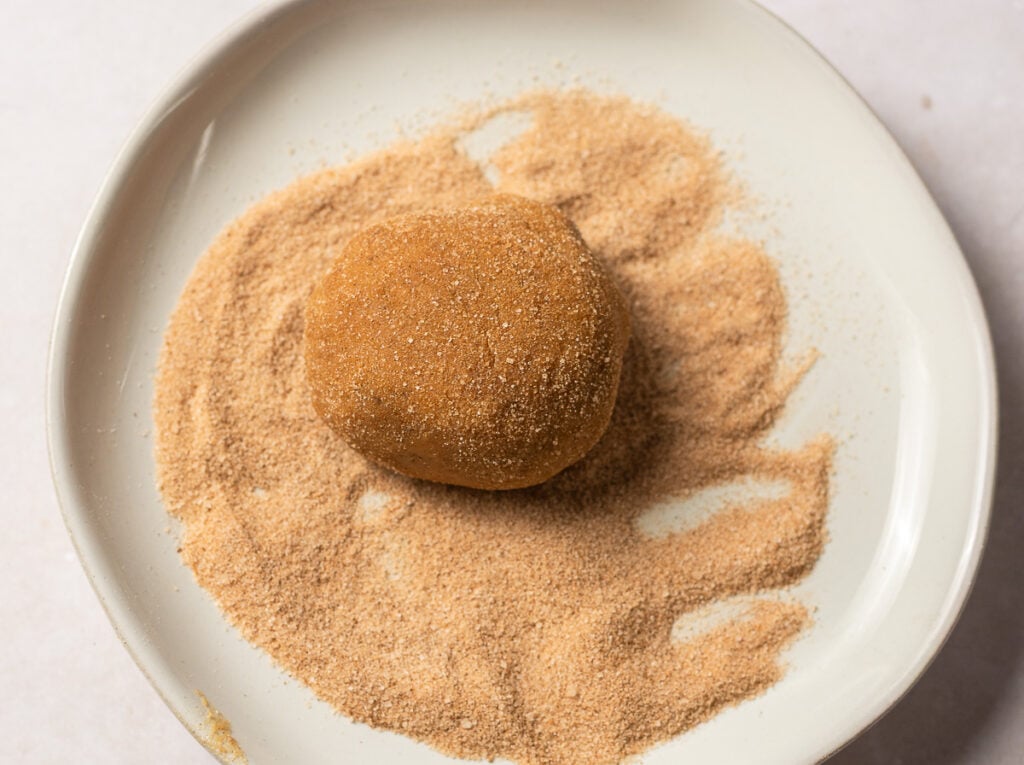
Step 5. Add the mixture of dry ingredients set aside earlier and fold using a spatula until there are no more dry spots. The dough will more likely resemble a batter but this is fine. Chill for 45-60 minutes until you can scoop the dough and it holds together in a ball.
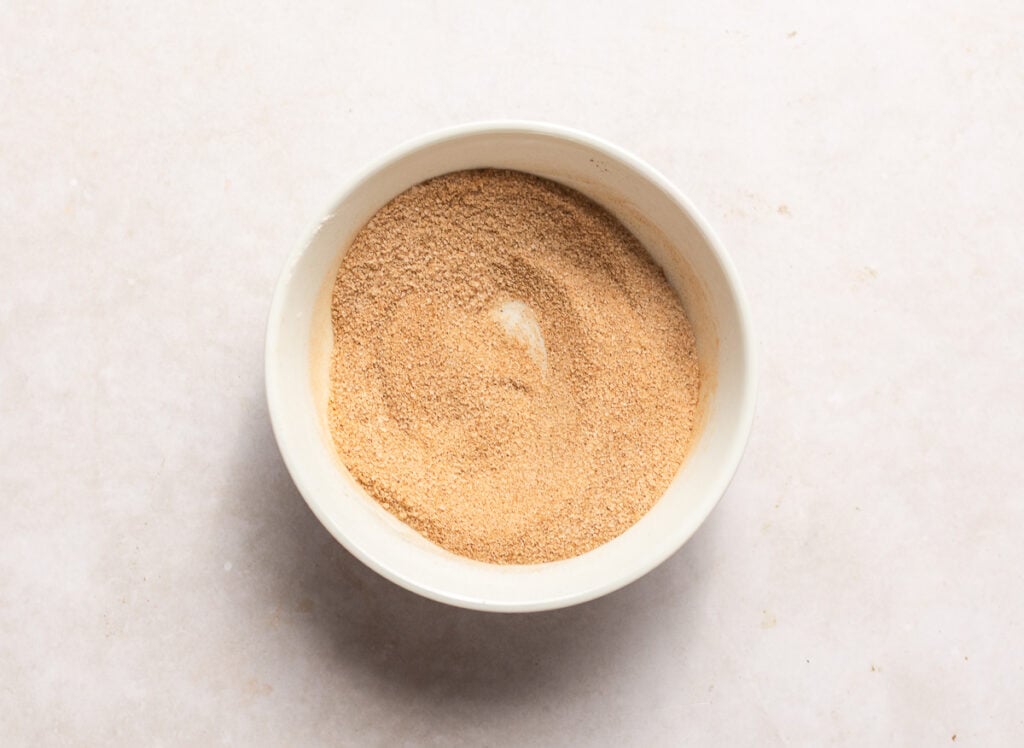
Step 6. While the dough chills make the cinnamon-sugar topping. Mix the ground cinnamon and granulated sugar in a small bowl until evenly combined.
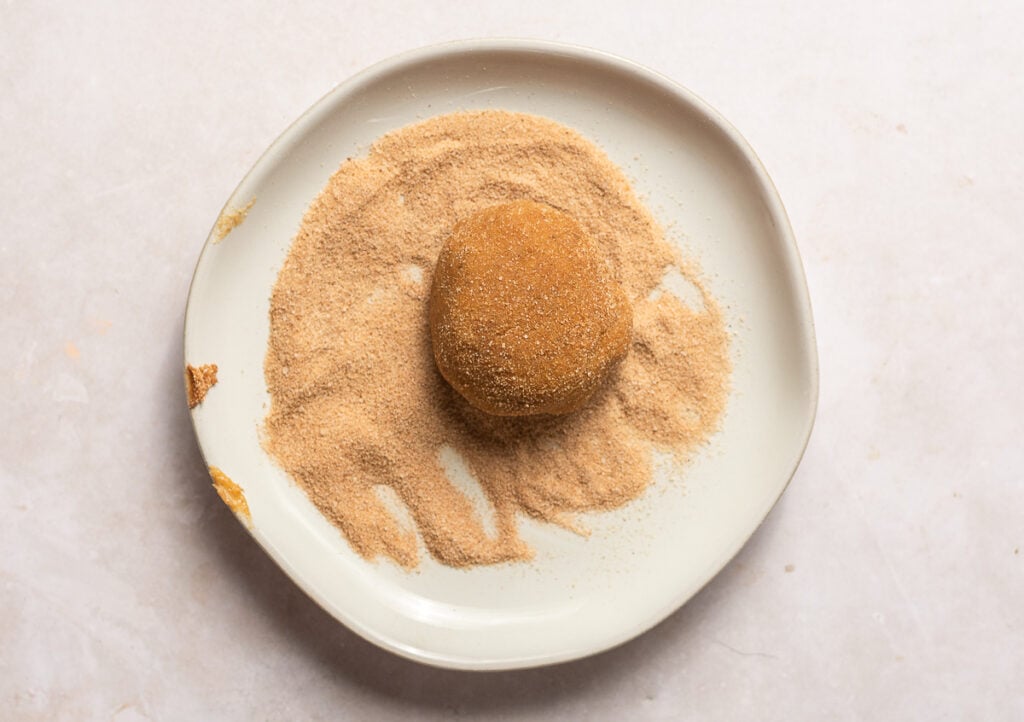
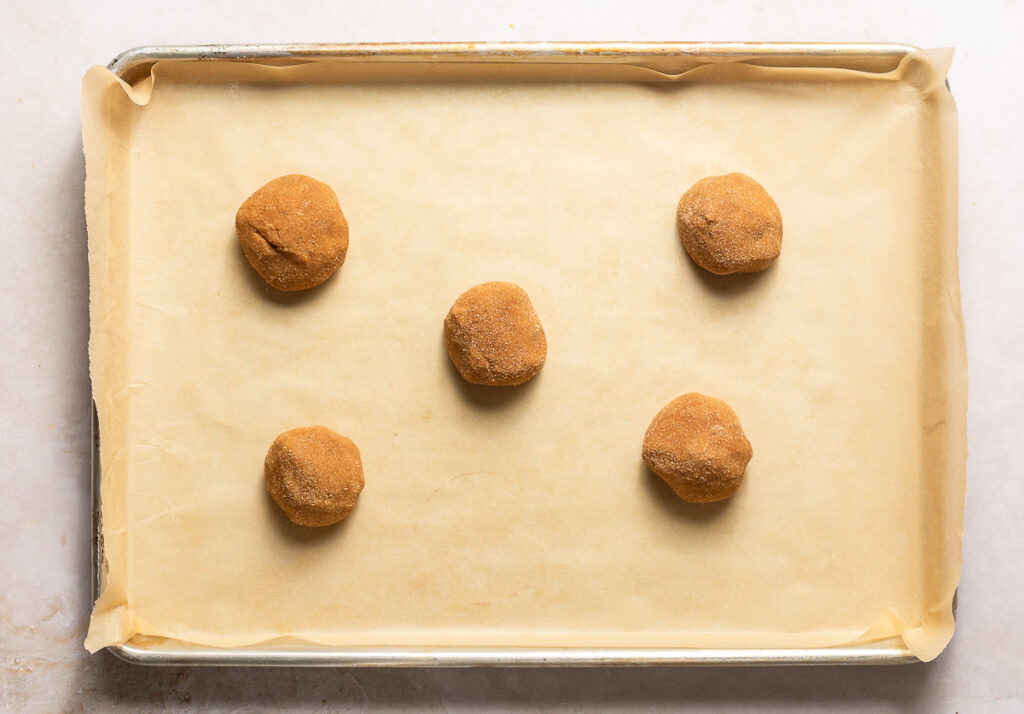
Step 7. Using a cookie or ice cream scoop, portion the cookie dough into 10 balls. Rolling each in the cinnamon sugar mixture until completely covered. A standard baking sheet can hold 5-6 cookies, properly spaced. Only roll as many that you will bake at a time. They dough should be chilled if you wait until after the first batch to bake another. If the you cover the cookie dough balls in the cinnamon-sugar topping it can dissolve with condensation.
Step 8. Place the cookie dough balls on a parchment-lined baking sheet leaving at least 2 inches of space around each to account for spreading.
Step 9. Bake for 8-10 minutes. I find the sweet spot to be 9 minutes - the cookies are completely done in the center but still have a soft texture once cooled. If you prefer a crisper outside layer bake for 10 minutes.
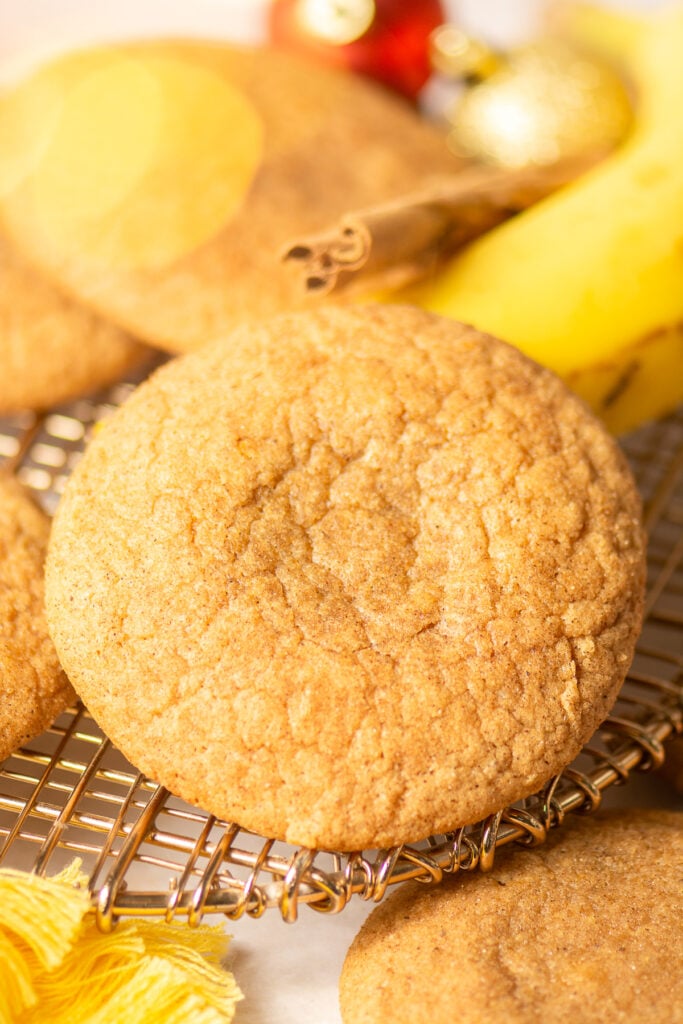
Allow to cool on the baking sheet and store in an airtight container for up to 5 days for optimal flavor.
Brown Butter Banana Snickerdoodle Cookies
Ingredients
Equipment
Method
- Melt the butter over medium heat and allow the milk solids to toast until brown. Stir constantly with a spatula, scraping the bottom of the pan so the milk solids don't burn. The butter will sputter at first. Once the sputtering slows, keep a sharp eye on the butter as this means all the water has evaporated and the butter should be about ready. Continue stirring until the milk solids reach a deep brown color.
- Once the milk solids have reached a deep brown color remove the browned butter from the heat immediately and pour it into your mixing bowl. This will reduce the heat and prevent the butter from continuing to cook and burning.
- Preheat the oven to 400°F
- Mix the all-purpose flour, cake flour, ground cinnamon, cream of tartar, baking soda and salt in a separate bowl & set aside.
- Add the dark brown sugar, granulated sugar and vanilla extract to the bowl of browned butter and mix with a spatula until it forms a homogenous mixture. (The butter should still be melted, you don't have to wait for it to cool)
- Add the egg and the pureed banana and mix again until completely smooth.
- Add the flour mixture set aside earlier and fold using a spatula until there are no more dry spots. Chill for 45-60 minutes until you can scoop the dough and it holds together in a ball.
- While the dough chills make the cinnamon-sugar topping. Mix the ground cinnamon and granulated sugar in a small bowl until evenly combined.
- Using a cookie or ice cream scoop, portion the cookie dough into 10 balls. Rolling each in the cinnamon sugar mixture until completely covered. Only roll as many as you will bake at a time and roll in the cinnamon-sugar topping right before baking.
- Place the cookie dough balls on a parchment-lined baking sheet leaving at least 2 inches of space around each to account for spreading.
- Bake for 9 minutes. If you prefer a crisper outside layer bake for 10 minutes.
- Allow to cool on the baking sheet and store in an airtight container for up to 5 days for optimal flavor.
Love this recipe?
Tag @TheStushKitchen on instagram!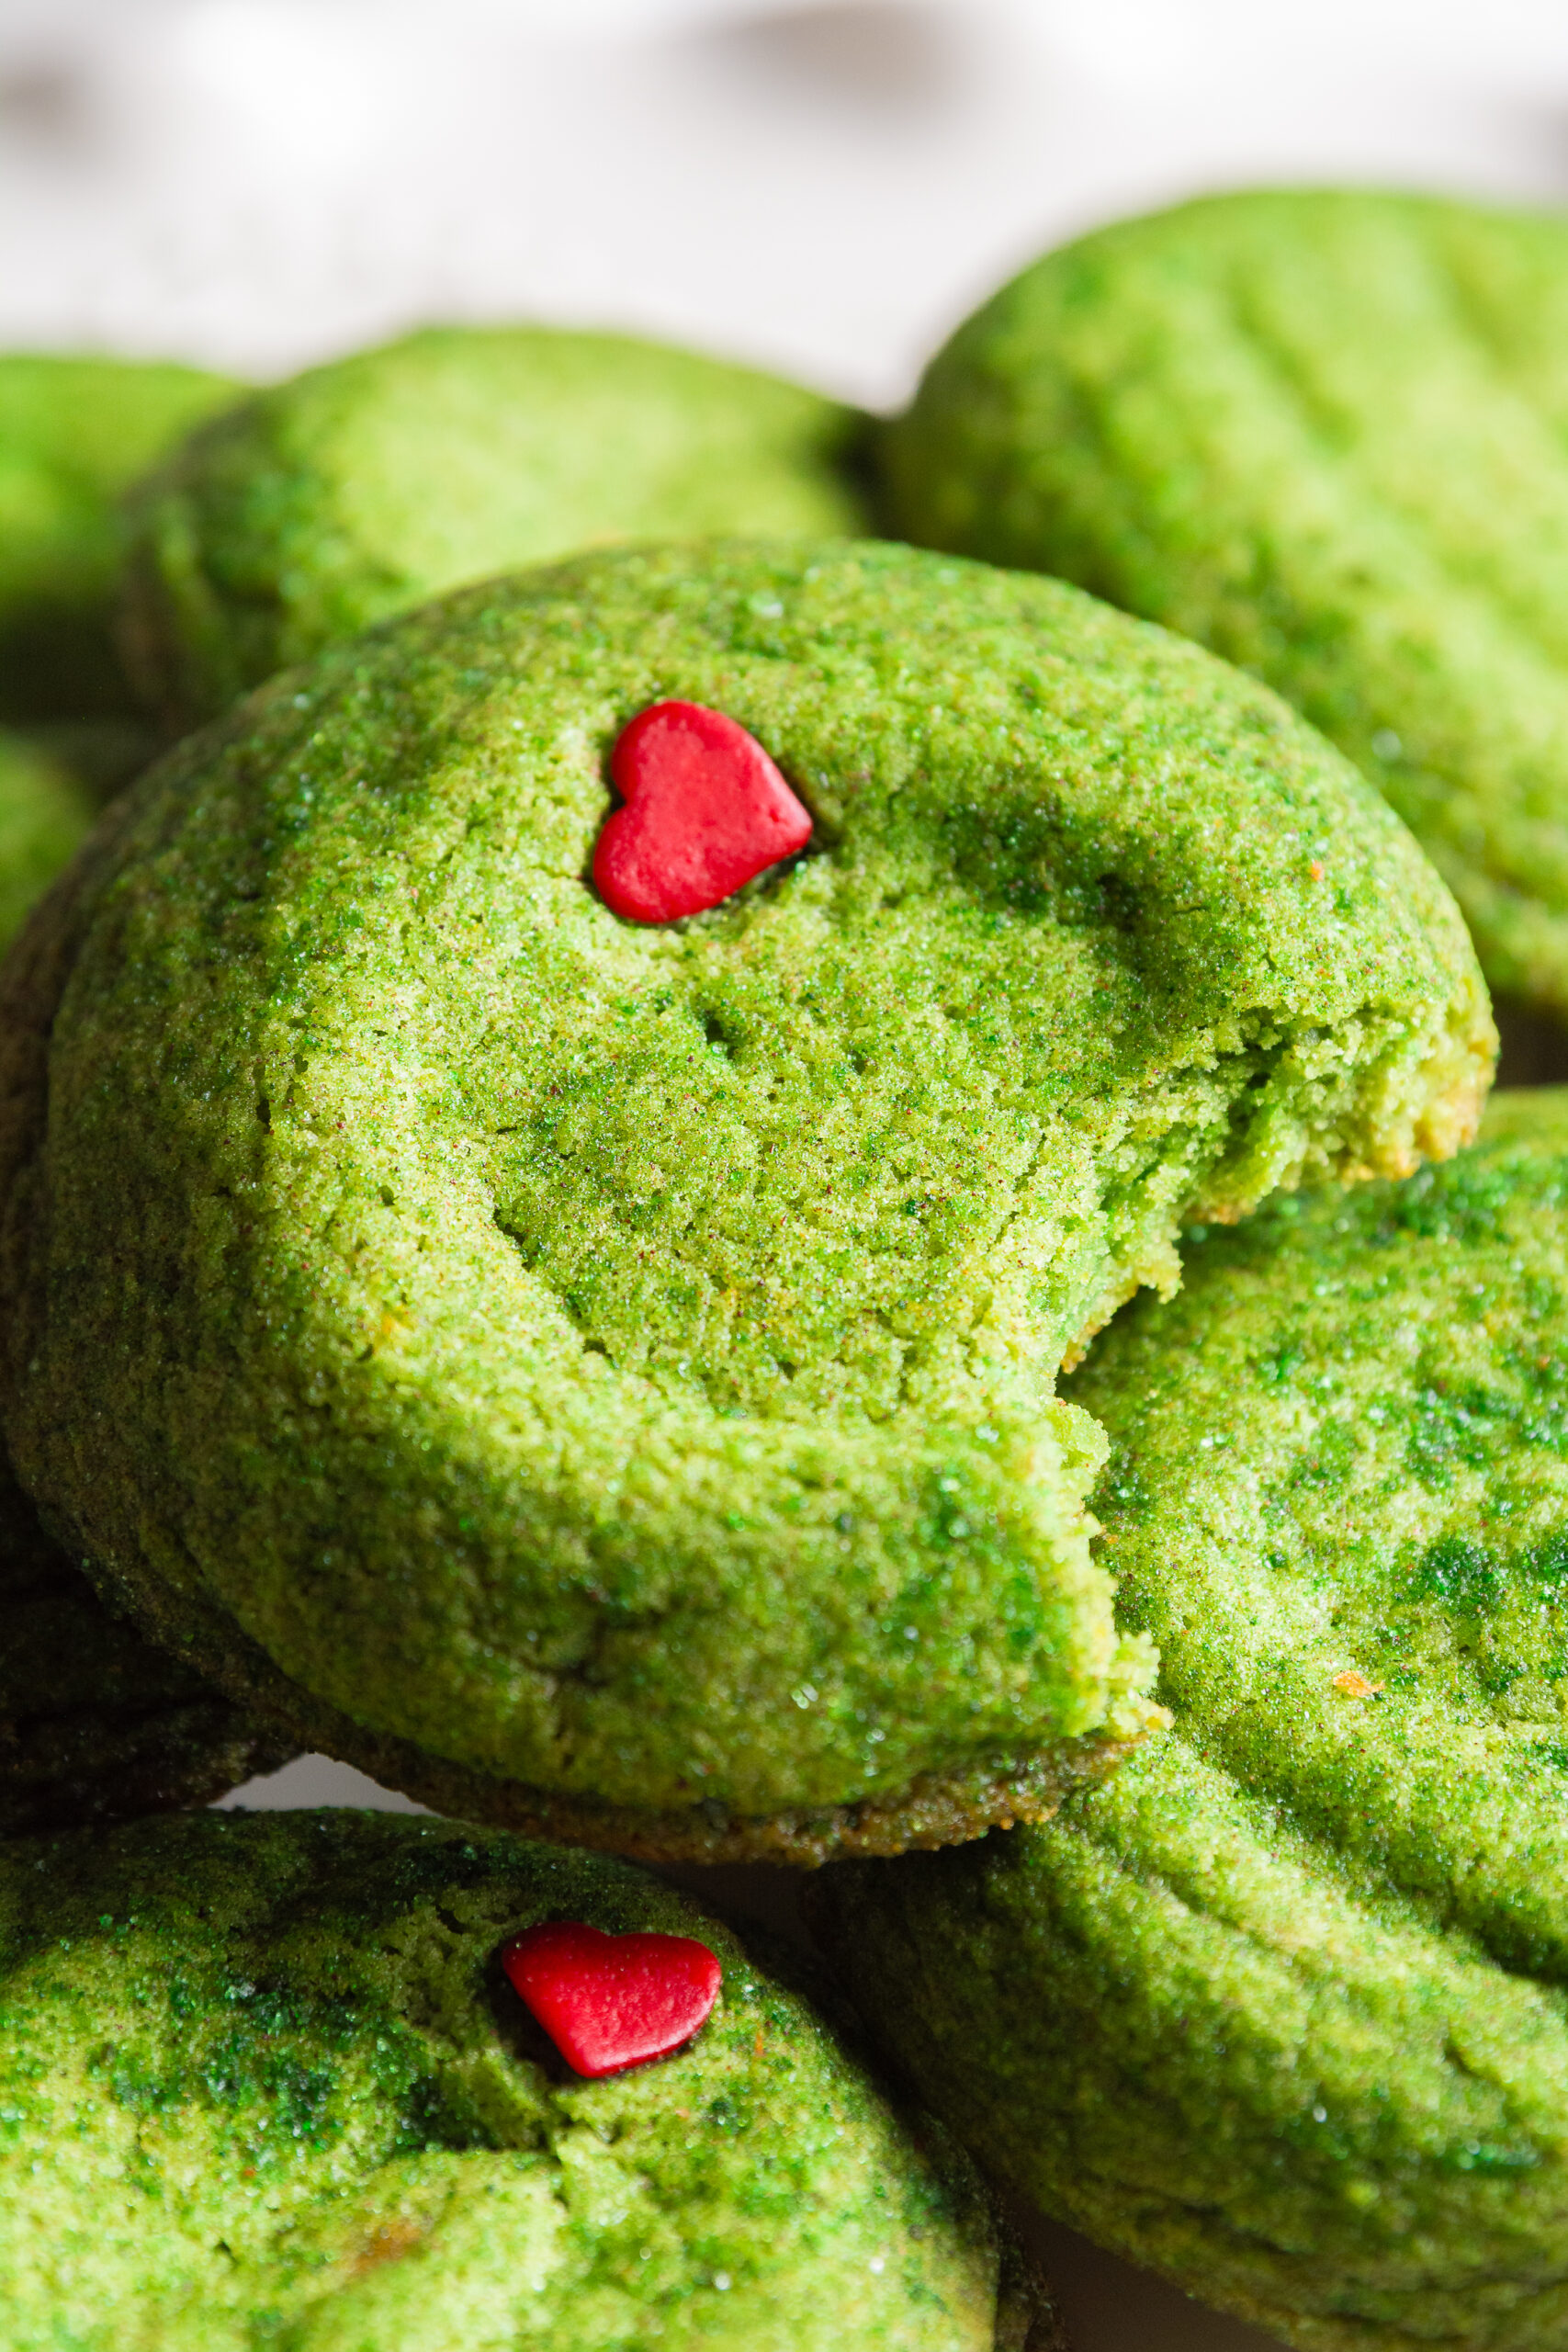
Grinch Snickerdoodle Cookies
Ingredients
For the Cookies
- 1 ½ cups all-purpose flour
- ¾ cups melted unsalted butter 1 ½ sticks
- 1 cup (packed) brown sugar
- 1 large egg
- 1 ½ teaspoon ground cinnamon
- 1 teaspoon vanilla
- 1 teaspoon cornstarch
- 1 ½ teaspoon cream of tartar
- ½ teaspoon baking soda
- ¼ teaspoon salt
- green food coloring
- yellow food coloring optional as needed for brightening the shade of green
- red confetti hearts
Cinnamon Sugar Coating
- 1 ½ tablespoon granulated sugar
- ½ teaspoon ground cinnamon
Instructions
- Mix the all-purpose flour, salt, cornstarch, cream of tartar, baking soda and cinnamon in a small bowl until evenly distributed. Set aside.
- Add the melted butter and the brown sugar to a separate bowl and mix with a spatula until completely combined and smooth.
- Add the egg and mix again until smooth.
- Add the all-purpose flour mixture from step 1 along with the green food coloring and mix until smooth. If your green is closer to a moss shade you can add a bit of yellow food coloring to brighten it.
- Chill the dough for at least 30 minutes in the refrigerator.
- While the dough chills make the cinnamon sugar coating. Add the granulated sugar and cinnamon to a small bowl and stir to combine.
- Add the green (and yellow if needed) food coloring to the cinnamon sugar until the desired color is achieved and mix with a spoon or gloved hand to distribute the pigment. If using a spoon, press the the clumps of pigment into the sugar. If doing this step by hand use a rubbing motion at your fingertips to distribute the pigment. Set aside.
- Once the dough has been chilled, portion it out into 8-10 equally sized balls (about the size of a ping-pong ball or slightly larger). Roll the dough between your palms to form them into spheres.
- Roll the dough spheres in your dyed cinnamon sugar - coating them thoroughly and evenly
- Press a confetti heart into each of the cookie dough balls, positioning them off-center.
- Arrange the coated cookie dough spheres on a parchment-lined baking sheet allowing for about 2 inches of space around each to account for spreading.
- Bake the cookies for 8 minutes at 395°F.

A literal dream cookie! Can't wait to switch things and make them for thanksgiving