
Honey Lemon Layer Cake - How I Made Meghan Markle's Cake Even Better!
I made Meghan Markle's honey lemon layer cake from her new Netflix series, "With Love, Meghan" and while her version was nice enough, it left a little to be desired on both texture and flavor so I made some tweaks to turn it into the absolute stunner it deserved to be!
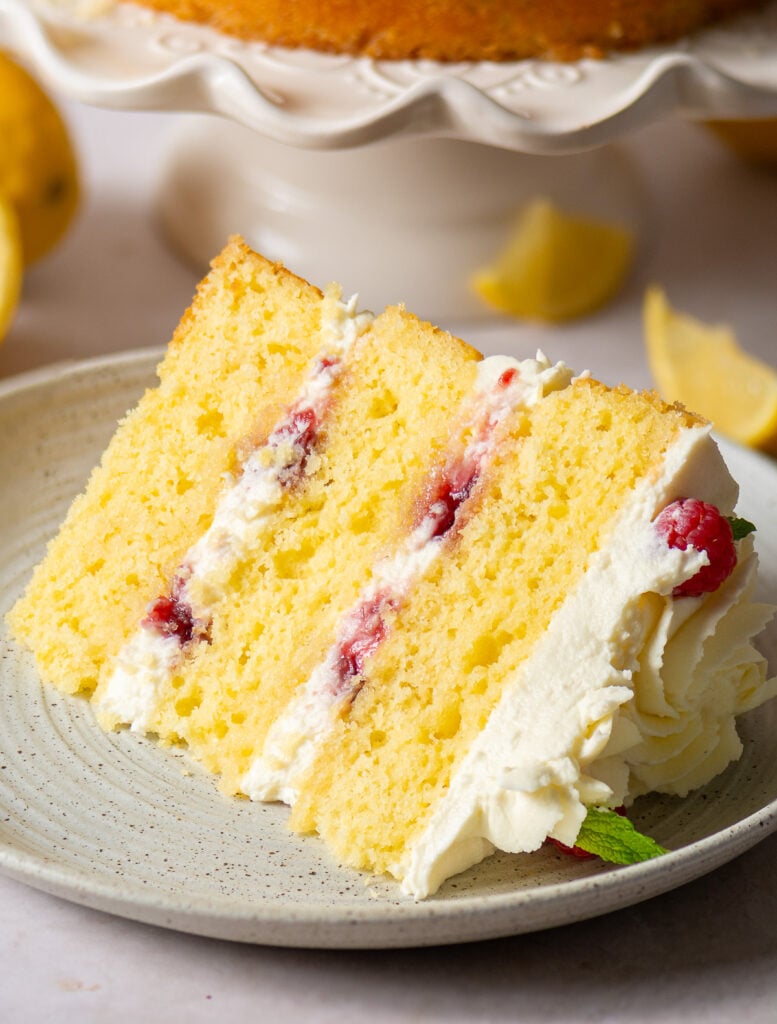
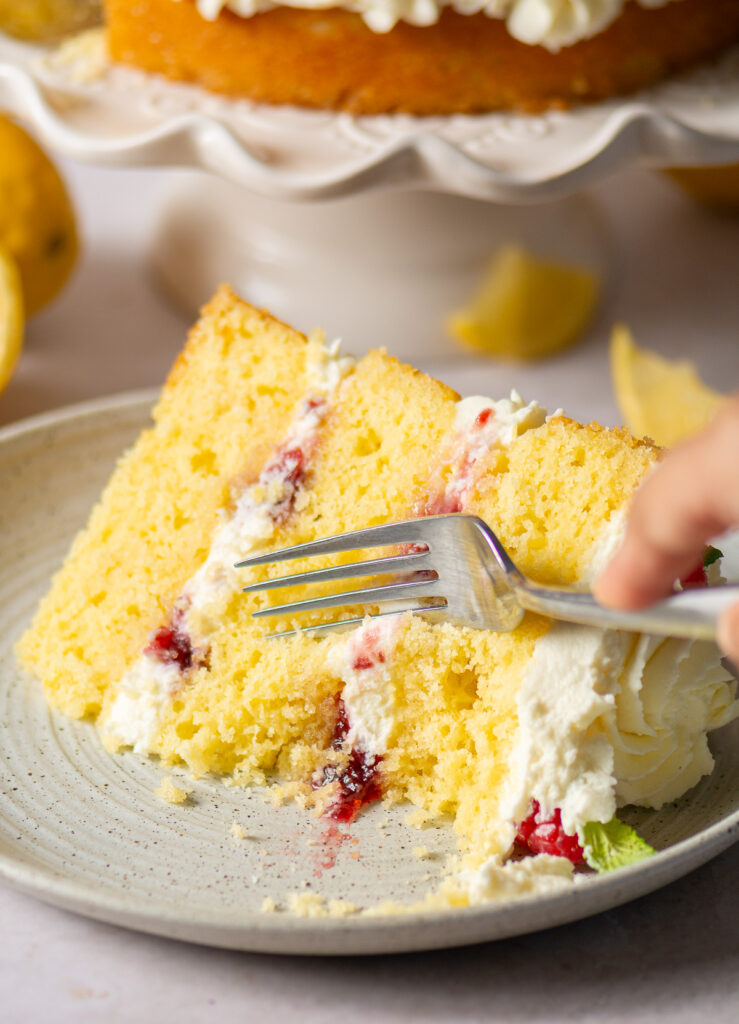
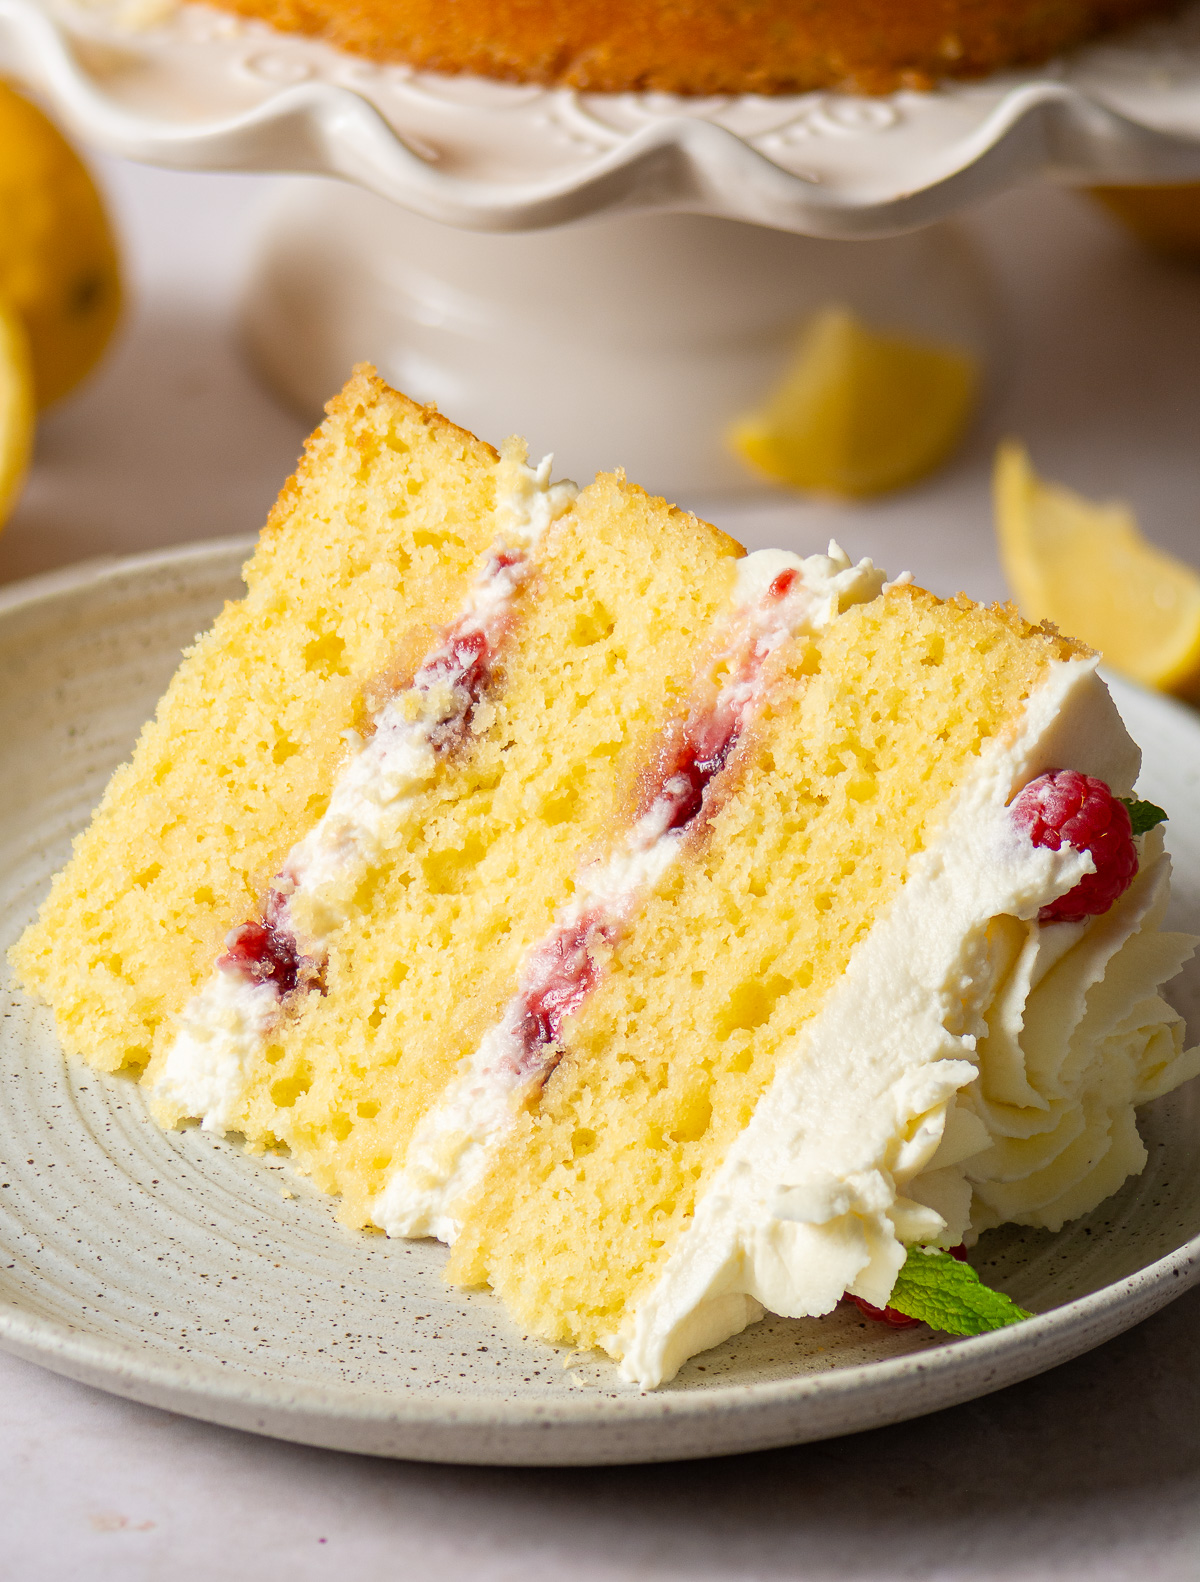
Light & tender cake layers infused with lemon zest, honey, and olive oil. Filled with luscious raspberry preserves and a silky mascarpone Chantilly cream. This version elevates the original with a more vibrant lemon punch and a beautifully soft texture!
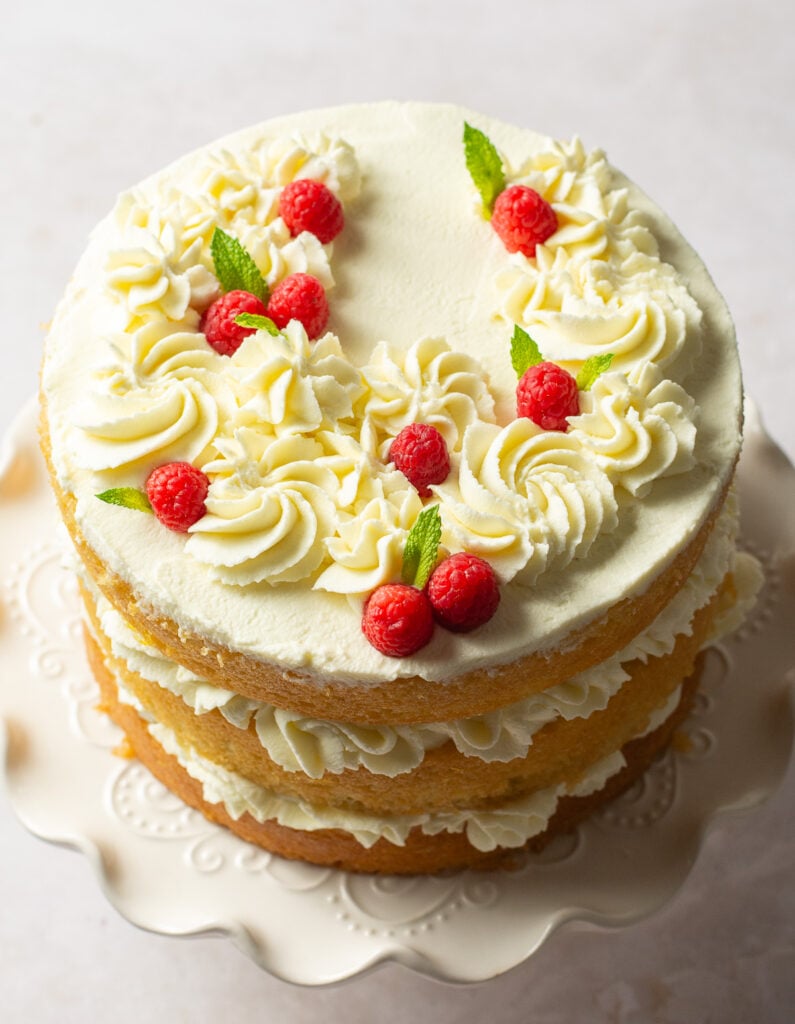
If you haven't gotten around to binge-watching yet, the pilot episode, "Hello, Honey!" features a stunning three-layer lemon, honey & olive oil cake she makes for her close friend, Daniel Martin. It's decorated as a chic naked cake and filled with homemade raspberry preserves and buttercream. The royal then adds some fresh raspberries and lemon verbena leaves as her cherries on top.
Now, the Duchess of Sussex does disclaim in the first episode that "baking is not [her] favorite thing, but she will do it for her favorite people." So am I holding the shortcomings of this cake against her? Absolutely not - especially since the concept was amazing and once the right adjustments were made it was downright delicious!
This is a wonderful spring cake and a particularly perfect cake if you're hosting a spring garden party! However, if you're a lemon purist looking for a dessert that absolutely screams lemon in every bite you're better off trying this simple, moist lemon cake recipe, these airfryer lemon cheesecakes or this lemon blueberry crumb cheesecake!
What I Liked About Meghan's Honey Lemon Layer Cake
- It calls for minimal equipment. You can easily make the cake by hand and theres no need for a stand or even hand mixer. In fact a mixer is likely to cause more gluten to develop, resulting in a tougher cake so keep that paddle attachment stowed away.
- It's oil based. Oil based cakes tend to be much more moist. In addition, the cake will stay soft when refrigerated as opposed to butter cakes that come off as tough and dry when cold.
- The addition of raspberry preserves. At first I thought it would have been out of place or add too much chaos to the flavor profile of the cake but boy was I wrong! It complements the lemon, honey and olive oil perfectly.
What I didn't like about the Duchess' Honey Lemon Layer Cake
- It didn't have any lemon flavor. Meghan added the lemon zest directly into the wet ingredients. In my opinion, not rubbing the zest is a cardinal sin. Citrus flavor lives in the zest. More flavor is released as the zest is agitated. I opt for rubbing the zest into the sugar. I ditch the lemon juice since it makes the cake sour.
- The honey lemon simple syrup made the cake sour. I usually don't use tons of lemon juice in cakes, if any because all it can cross that boundary of "tart" and go straight to sour. I completely omitted the lemon juice from the simple syrup glaze and simply used lemon zest, honey & water.
- The baking temperature was too high. Meghan baked her cake layers at 350°F. The higher temperature caused the cake layers to dome which isn't optimal for a layer cakes since you'll either have to cut these off for a stable stacked cake or deal with a wobbly uneven cake. I reduced my baking temperature to 325 °F. This gives the cakes a more even rise and level top!
- She uses imperial measurements which can be counterproductive to consistent results since a cup of flour can be more or less depending on the person measuring. When I tested Meghan's version of the cake I used a kitchen scale and noted the metric equivalent and made adjustments based off those.
- She uses a buttercream frosting which I think is way too heavy for the light and bright flavors in this cake so I swapped it for a Chantilly whipped cream stabilized with mascarpone! A cream cheese frosting would also complement this cake nicely!
Key Ingredient Breakdown & Substitutions for the Cake
Lemons. Meghan opts for fresh lemon zest which is perfect. I do disagree with how it was incorporated and not rubbing the zest in likely had everything to do with why the cake lacked lemon flavor. I also used zest from an extra lemon for a total of 3 lemons used for the cake layers.
Flour. In the episode Meghan doesn't specify what kind of flour she used but Tudum (Netflix's behind-the-scenes companion website) confirms that her recipe uses all-purpose flour. I opted for cake flour for a softer cake.
Sugar. Granulated white sugar was used in the episode and I didn't change this. I would not swap for maple or brown sugar since those richer flavors will over power the delicate flavors in this cake.
Olive oil. When watching the episode my first thought was that it would overpower the honey and mask some of the lemon zest but I was pleasantly surprised! The olive oil flavor was present but subtle and perfectly complements the honey, lemon & raspberries. I didn't change this, using extra virgin olive oil but you could use a neutral flavored oil like grapeseed or vegetable oil if you wanted.
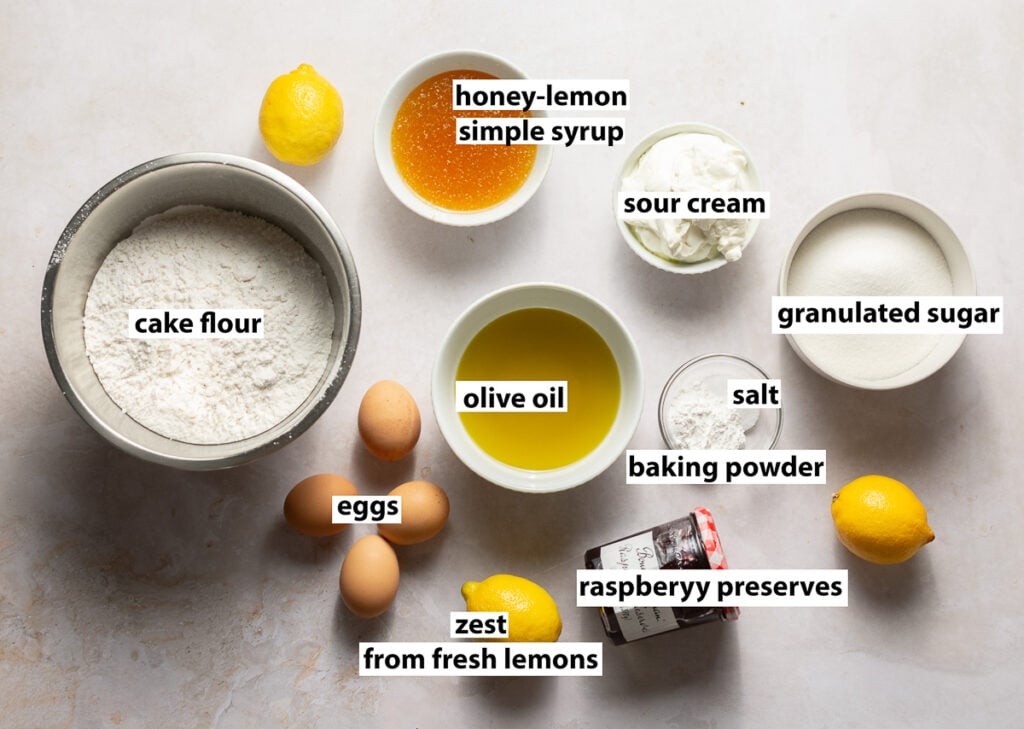
Liquid. In her recipe, the Duchess opts for milk. I tried her recipe with both whole and skim milk and didn't have much difference in how moist the cake was. I swapped milk for full-fat sour cream in my version. Since sour cream has more fat than whole milk it made the cake incredibly moist. The slight tang also complements the lemon flavor.
Eggs. Meghan uses whole eggs in her recipe. I did the same. I don't think separating and whipping the egg whites in this recipe would make a huge difference in this recipe and would be an unnecessary extra step.
Honey. She uses it in both the honey lemon cake layers and the simple syrup - or "the glaze" as Meghan calls it. For the cake, the honey was completely lost so I omitted it completely and used the simple syrup to add that layer of flavor to the cake.
I didn't like the addition of lemon juice in the simple syrup as it made the syrup and the cake sour and overpowered the honey flavor. I completely omitted lemon juice and just opted for honey, water and lemon zest.
Raspberry preserves. Adds a beautiful fresh element to the cake. Make sure you use preserves and not jam or jelly. Like Meghan mentions in the episode jam has more sugar than preserves which can mask the fruit's natural flavor. Almost any berries will complement the flavor of this cake so you can also use strawberry preserves or even this easy blueberry compote!
Frosting. The frosting is made off-screen but the royal does mention that she uses a buttercream. According to Tudum the buttercream is an American buttercream - powdered sugar and unsalted butter. I found this too heavy for the cake so I opted for a light Chantilly cream.
Tips for Making this Honey Lemon Layer Cake
Use a piping bag for layering your cake. The Duchess opts to forego piping bags referring to them as "fancy equipment" and stating you can do the same thing with a zip-top bag but this isn't completely true. A Ziploc bag can be used in a pinch it doesn't offer the same control as a piping bag. In addition I used a piping tip for more of an aesthetic look.
Level the cake batter in the pan before baking. If the cake batter is uneven, your cake layer will also be uneven. You can use a spatula to level it out or tap the cake pan on your counter a couple times to level everything out.
Use an oven thermometer. One of the downfalls of Meghan Markle's cake was the doming which forced you to use a bread knife to cut off the mounded top of each cake. This doming is caused by the higher baking temperature. In addition to having hotspots, your oven can run hotter or cooler than the presented reading so using an oven thermometer takes out the guesswork so you can have predictable and consistent results every time!
How to Make Meghan Markle's Honey Lemon Layer Cake 2.0
Step 1. Preheat oven to 325°F.
Step 2. Add the lemon zest and sugar to a large bowl and rub the zest into the sugar for about 2 minutes. The sugar should resemble kinetic sand when done.
This is a crucial step and will release all the lemon flavor held in the zest. The more friction applied, the more flavor is released.
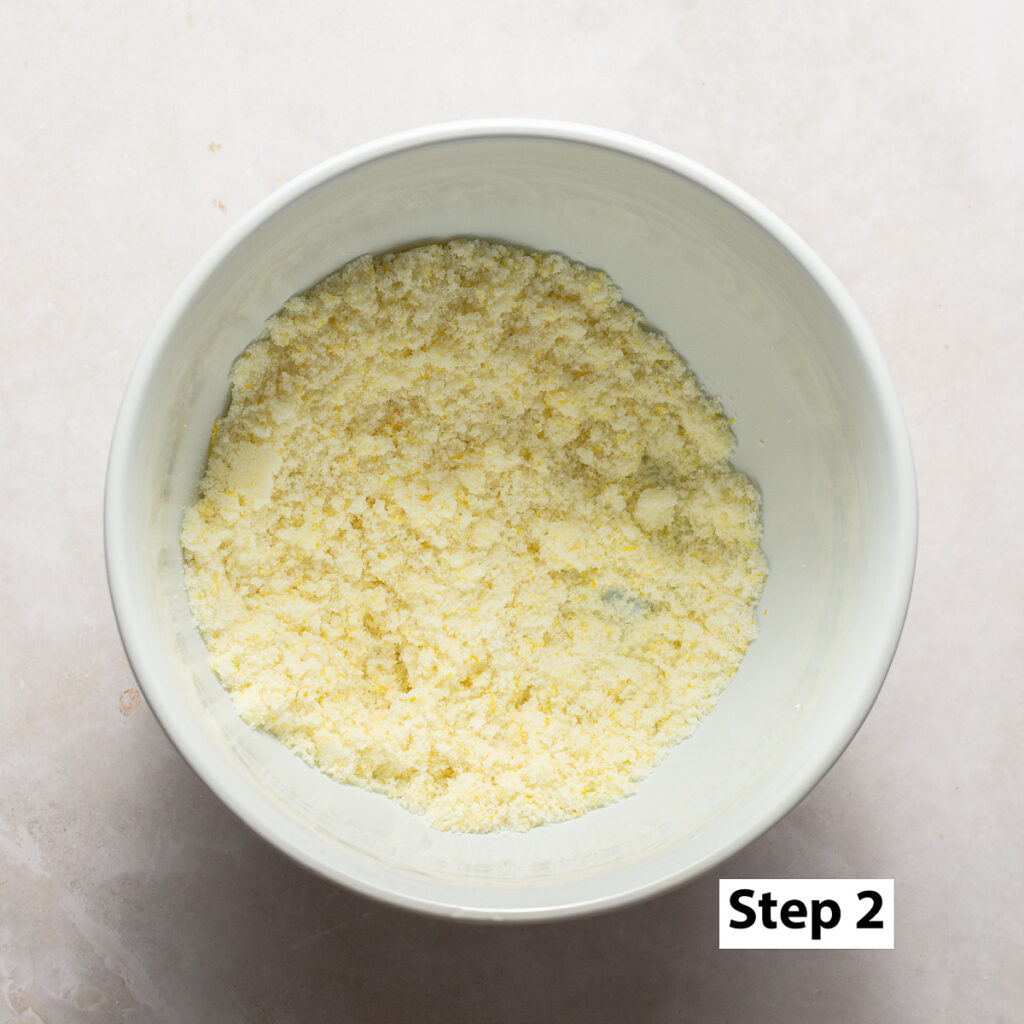
Step 3. Add the rest of the dry ingredients - the sifted cake flour, baking powder & salt to the sugar/zest mixture and stir with a spoon to evenly distribute everything.
Step 4. In a separate bowl combine all your room temperature wet ingredients - the olive oil, sour cream and eggs. Whisk to break up the eggs and mix til smooth.
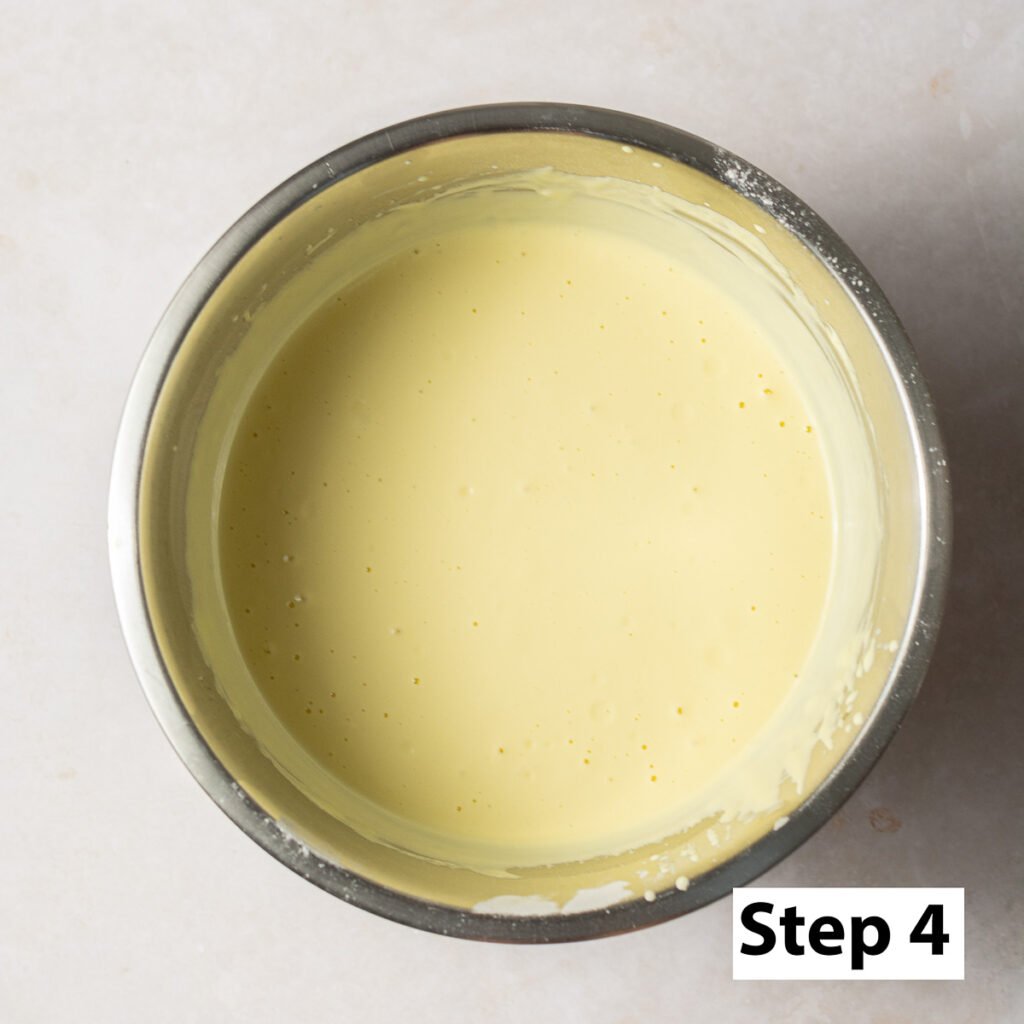
Step 5. Add the wet ingredients to the dry and stir until the batter is smooth.
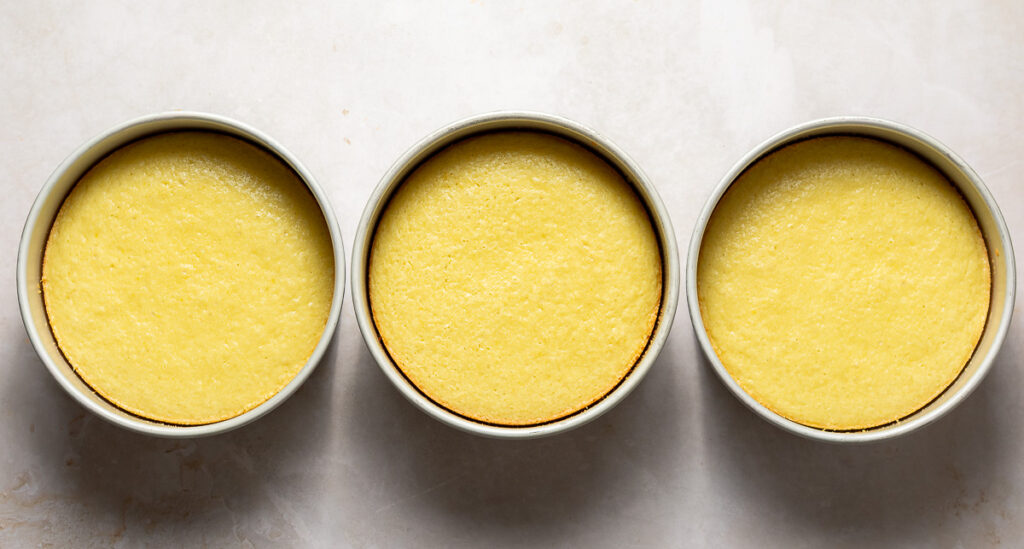
Step 6. Prepare your 8-inch round cake pan with baking spray and divide batter equally among 3 pans. You can also add a parchment paper circle to the bottom of the pan for added ease of removal.
Step 7. Bake on the middle rack of your oven for 20-30 minutes or until the top of the cake spring back when touched or when a skewer comes out with only a few crumbs. Waiting until a toothpick comes out clean can result in a dry cake.
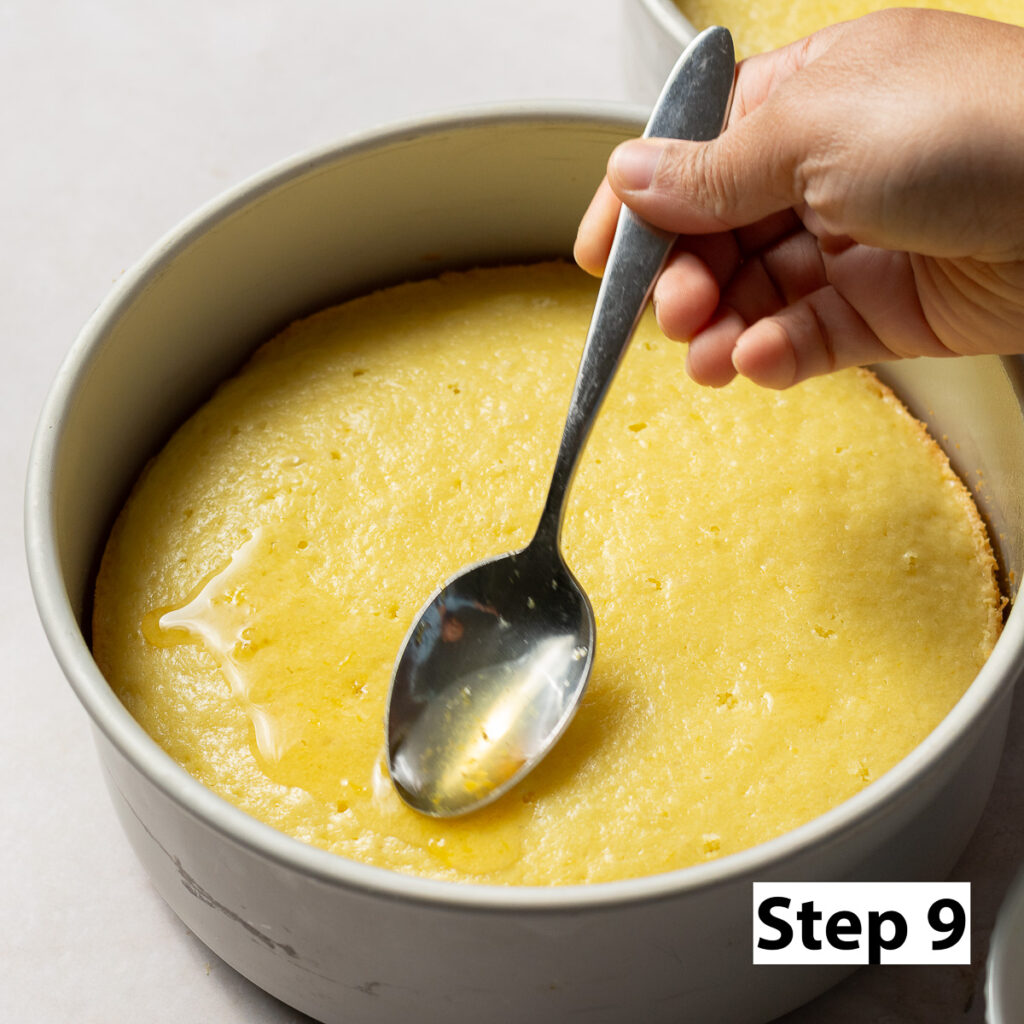
Step 8. While the cakes bake, make the honey glaze. Add the hot water, honey and lemon zest to a heat-proof bowl and mix to incorporate. Set aside until the cakes are ready.
Step 9. After baking let the cake cool slightly then, while still warm, poke with a toothpick or cocktail pick. Spoon the honey-lemon syrup over the top of the cake and down the edges while the cake is still warm. Repeat this with all three cake layers. Allow the cakes to continue to cool. If leaving overnight to assemble the next day, over the layers with plastic wrap.

How to Make the Mascarpone Chantilly (Whipped) Cream
I recommend making the whipped cream right before assembling your cake since it starts to "set" slightly about 10 minutes after being made which can result in piping that isn't as smooth since the cream is a little stiffer. If you do make it ahead of time though simply return it to you mixer and whip for 10-20 seconds.
Step 1. Add the cold heavy whipping cream, confectioner's sugar & vanilla bean paste (or vanilla extract) to the bowl of a stand mixer and whip on high speed with whisk attachment until it forms soft peaks. The peak formed at the end of whisk should flop over like a Santa hat when inverted. Slowly bring your mixer up to high speed to avoid the heavy cream splashing out.
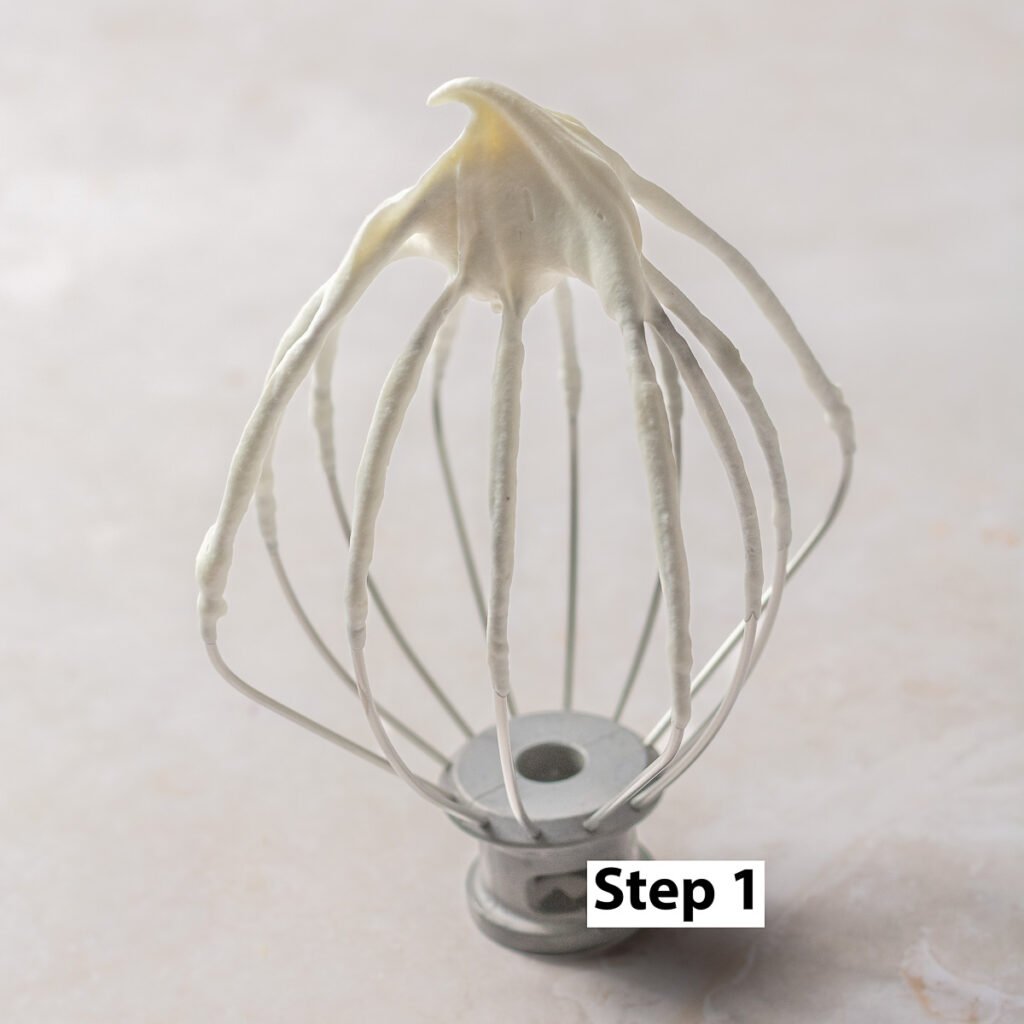
Step 2. Add all of the mascarpone cheese and whip on medium speed to medium-high speed until stiff peaks form and the whipped cream is smooth. This step should take less than a minute.
Step 3. Transfer the whipped cream to a piping bag affixed with a piping tip if using.
How to Assemble Meghan Markle's Honey Lemon Cake
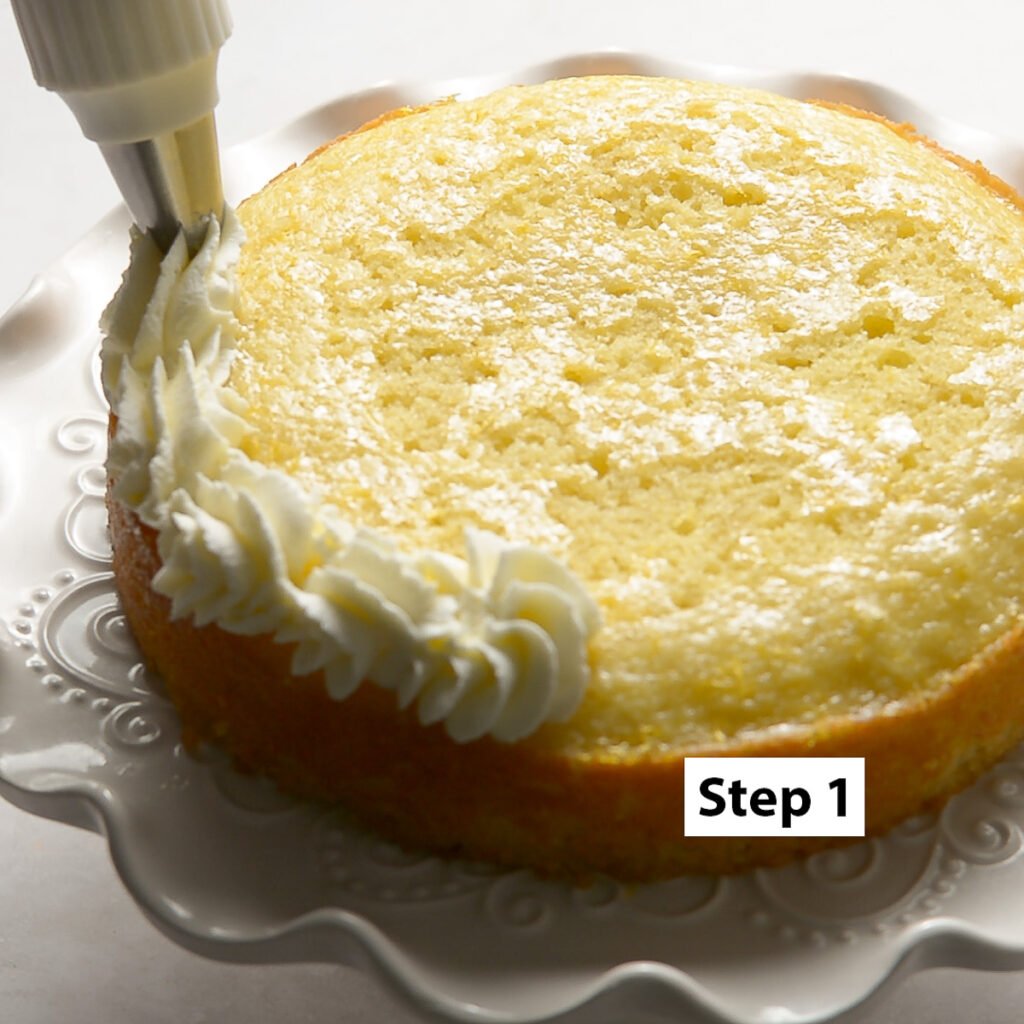
Step 1. Place your cooled cake layer on a cake stand or plate and pipe a border of whipped cream on top of the cake along the edge. Make sure the whipped cream border doesn't hang over the edge as this border will make the cake unstable. If you have any cake layers that are noticeably taller than the others, use this as the base since using them in the middle or top can cause your cake to topple or collapse on itself.
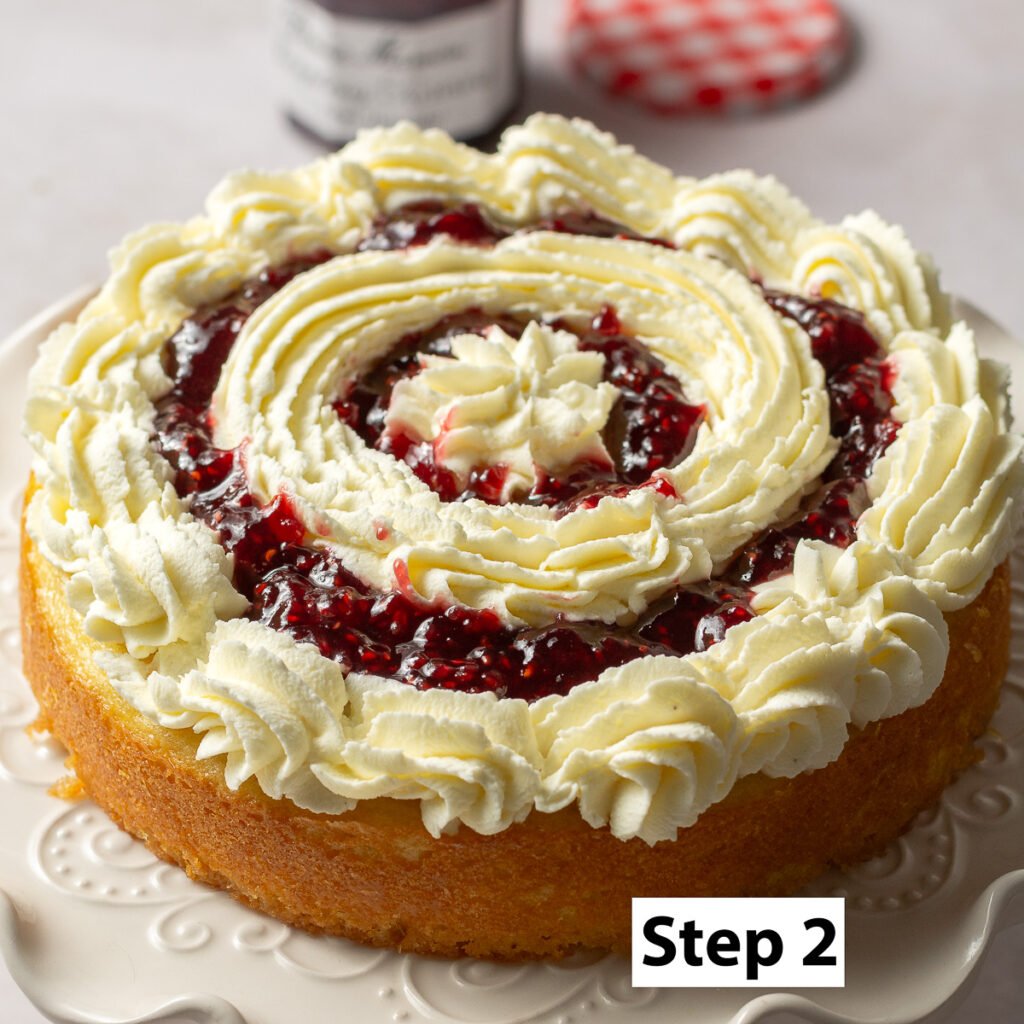
Step 2. Pipe another circle in the center of the cake and then a single dollop in the center. It should resemble a target. Fill the gaps in with your raspberry preserves.
Step 3. Repeat steps 1 & 2 with a second cake layer.
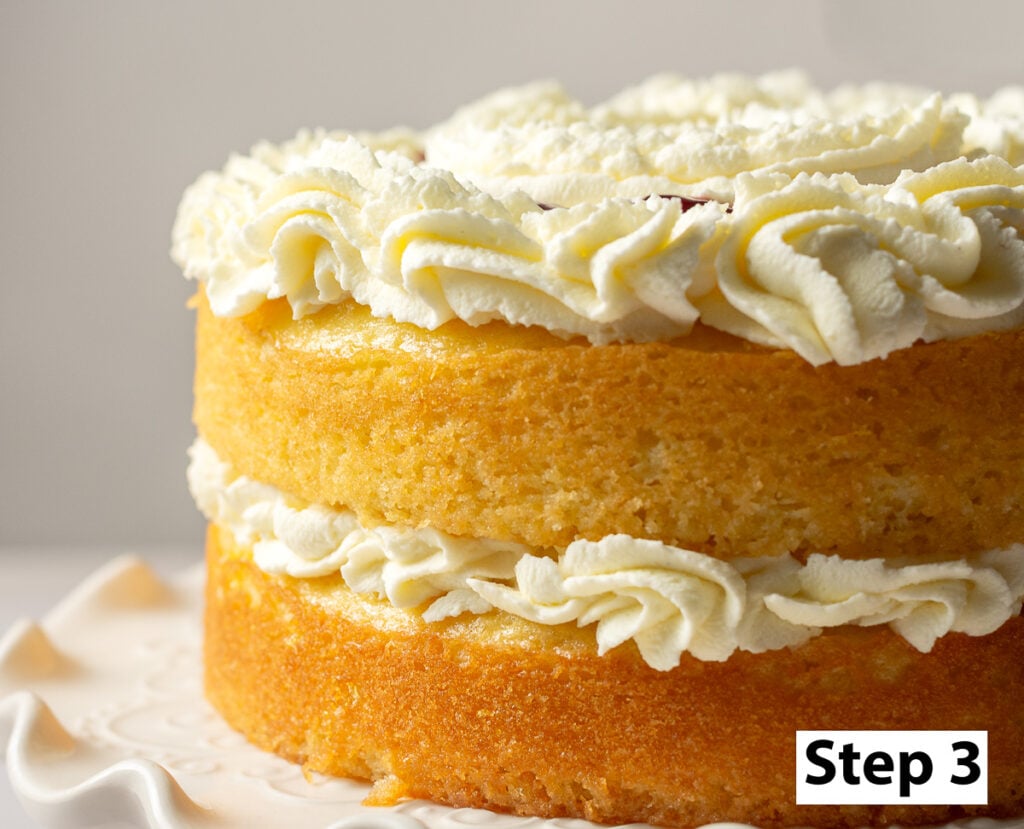
Step 4. Add your last cake layer on top. I like to invert this one so the perfectly flat bottom is now the top of the cake. This makes it easier for you to spread an even layer of the whipped cream that looks crisp!
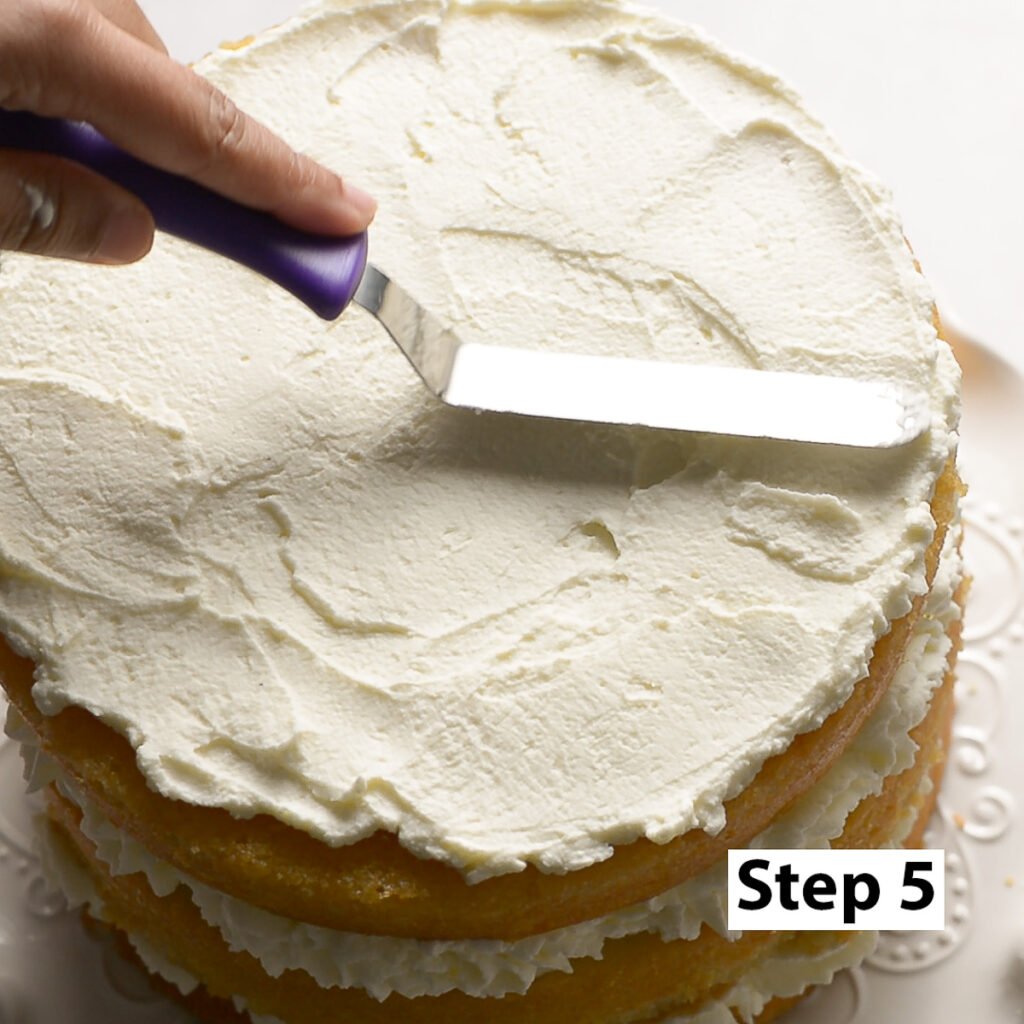
Step 5. Using an offset spatula spread a thin layer of the whipped cream on the top of your cake.
To get a clean edge, use a paddle motion to spread it over the edge slightly. Then, holding the offset spatula at a 45° angle pointed towards the floor, drag the excess frosting down the side of the top cake layer. Repeat this around the edge of the top layer.

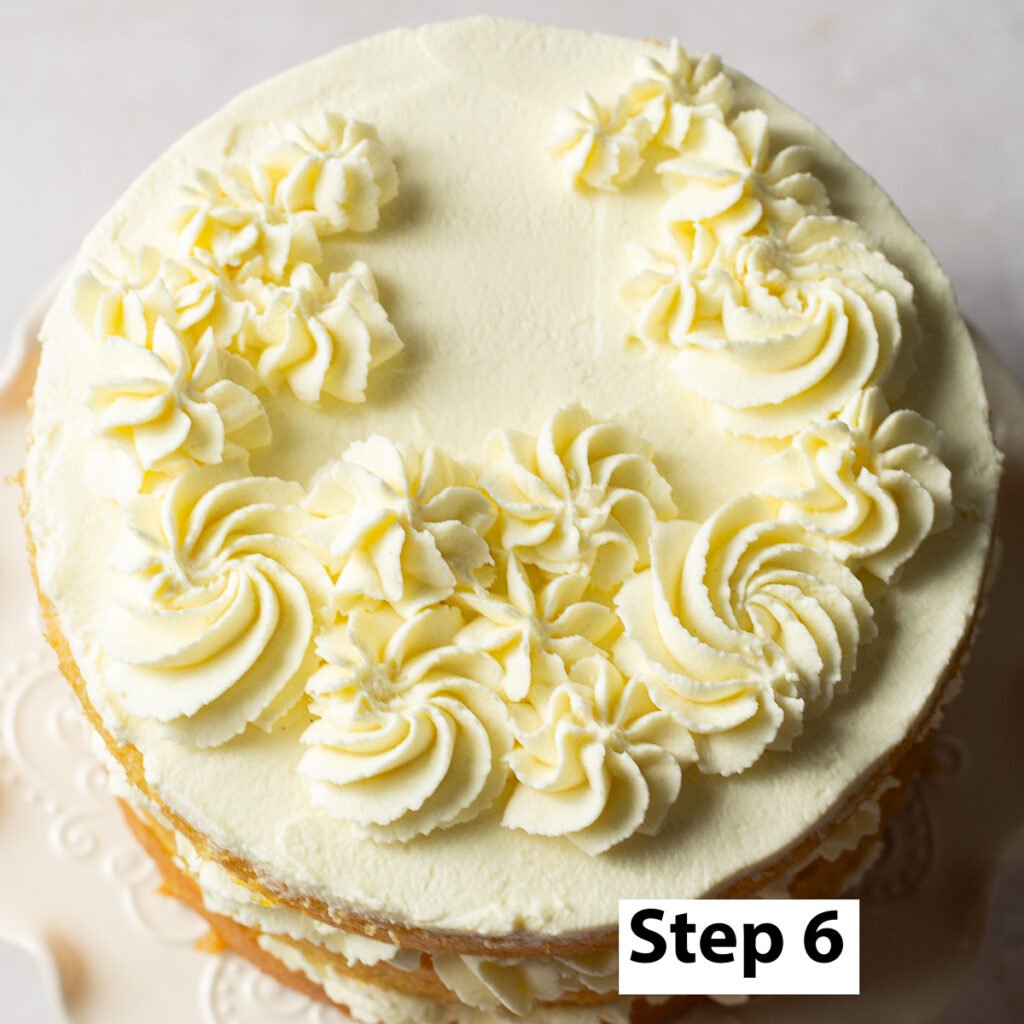
Step 6. Skip this step if you want to forego the piped rosettes on top. Using a rosette tip, pipe some rosettes in a a crescent pattern on top of the cake. For best results, vary the size and pattern.
For a full rosette, pretend you are piping a mini spiral. This'll be 2D so only pipe one layer for the rosettes.
For little rosebuds simply pipe dots. Vary the size by applying more pressure to the piping bag or holding it place for longer amounts of time.
Step 7. Place your fresh raspberries wherever you like on top of the cake and add your leaves next to them. Meghan uses lemon verbena leaves but I didn't exactly have those laying around so I used small mint leaves.
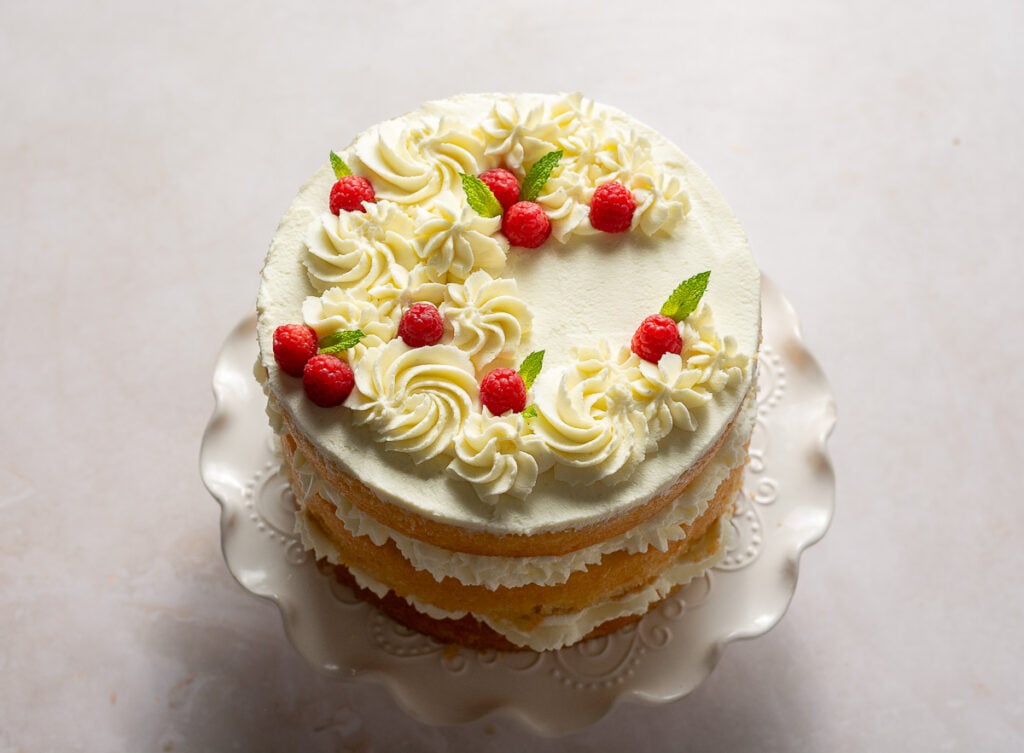
Slice and enjoy! Because of the whipped cream, this cake does need to be refrigerated if it won't be served immediately. Since this is an oil-based cake it will be soft even if served cold!
Honey Lemon Layer Cake Inspired by Meghan Markle
Ingredients
Equipment
Method
- Preheat oven to 325°F.
- Add the lemon zest and sugar to a large mixing bowl and rub the zest into the sugar for about 2 minutes. The sugar will resemble kinetic sand when you're done.
- Add the rest of the dry ingredients - the sifted cake flour, baking powder & salt to the sugar/zest mixture and stir with a spoon to evenly distribute everything.
- In a separate bowl combine all the wet ingredients adding all the olive oil, sour cream and eggs. Whisk to break up the eggs and mix til smooth.
- Add the wet ingredients to the dry and stir until the batter is smooth.
- Prepare three 8-inch cake pans with baking spray and divide the batter equally among the 3 pans. You can also add a parchment circle to the bottom of the pan for added ease of removal.
- Bake on the middle rack of your oven for 20-30 minutes or until the top of the cake spring back when touched or when a skewer comes out with only a few crumbs.
- While the cakes bake, make the honey glaze. Add the hot water, honey and lemon zest to a heat-proof bowl and mix to incorporate. Set aside until the cakes are ready.
- When the cakes are done allow them to cool slightly then, while still warm, poke with a toothpick or cocktail pick. Spoon the honey-lemon syrup over the top of the cake and down the edges while the cake is still warm. Repeat this with all three cake layers. Allow the cakes to continue to cool. If leaving overnight to assemble the next day, over the layers with plastic wrap.
- Add the cold heavy whipping cream, confectioner's sugar & vanilla bean paste to the bowl of a stand mixer and whip on high speed until it forms soft peaks. The peak formed at the end of whisk should flop over like a Santa hat when inverted.
- Add all of the mascarpone cheese and whip until stiff peaks form and the whipped cream is smooth. This step should take less than a minute.
- Transfer the whipped cream to a piping bag affixed with a piping tip if using.
- Place your cooled cake layer on a cake stand or plate and pipe a border of whipped cream on top of the cake along the edge. Make sure the whipped cream border doesn't hang over the edge as this border will make the cake unstable. If you have any cake layers that are noticeably taller than the others, use this as the base since using them in the middle or top can cause your cake to topple or collapse on itself.
- Pipe another circle in the center of the cake and then a single dollop in the center. It should resemble a target. Fill the gaps in with your raspberry preserves.
- Repeat steps 1 & 2 with a second cake layer.
- Add your last cake layer on top. I like to invert this one so the perfectly flat bottom is now the top of the cake. This makes it easier for you to spread an even layer of the whipped cream that looks crisp!
- Using an offset spatula spread a thin layer of the whipped cream on the top of your cake. To get a clean edge, use a paddle motion to spread it over the edge slightly. Then, holding the offset spatula at a 45° angle pointed towards the floor, drag the excess frosting down the side of the top cake layer. Repeat this around the edge of the top layer.
- Skip this step if you want to forego the piped rosettes on top. Using a rosette tip, pipe some rosettes in a a crescent pattern on top of the cake. For the prettiest results, vary the size and pattern.
- Place your fresh raspberries wherever you like on top of the cake and add your herb leaves next to them.
- Slice and enjoy! Because of the whipped cream, this cake does need to be refrigerated if it won't be served immediately but since this is an oil-based cake it will be soft even if served cold!
Nutrition
Notes
- Make the whipped cream right before assembling your cake since it starts to "set" slightly about 10 minutes after being made which can result in piping that isn't as smooth since the cream is a little stiffer. If you do make it ahead of time though simply return it to you mixer and whip for 10-20 seconds.
- If you have any cake layers that are noticeably taller than the others, use this as the base since using them in the middle or top can cause your cake to topple or collapse on itself.
- When piping the rosettes for a full rosette, pretend you are piping a mini spiral. This'll be 2-D so only pipe one layer for the rosettes.
For little rosebuds simply pipe dots. Vary the size by applying more pressure to the piping bag or holding it place for longer amounts of time.


Replicating her cake doesn’t mean you need to whine about her bakery skills. Just do you and she does her. Weird
Hi Nicole, I wonder if you read this blog post in its entirety. I didn't "whine about her bakery skills." I simply gave my opinion about the cake (I love the Duchess) and made several adjustments to my personal liking.
I want to make this, but I need it to be bigger. Do you think I could scale up the recipe and make it 1.25x the recipe to be able to put it in 9 inch rounds?
1.25x should definitely do the trick for a 9-inch cake! For taller/thicker layers you can also do 1.5x but this would be my max suggestion. I suggest using the serving calculator built into the recipe card. The number that you put in after clicking the question mark would be 3.75 (its 1.25*3). Or 4.5 (1.5*3) if you decide you want those taller layers.
Why hello there, Ainseanlea, This looks absolutely divine! I would love to make this for my Angel girls 16th birthday, however she cannot eat gluten. Do you think I could swap the flour for gluten free flour? Any advice would be super appreciated. Thank you for all your wonderful recipes.
Hi Maree! I haven't tried the recipe with gluten-free flour but i can't think of any reason why it wouldn't work. I like to use Bob's Red Mill Brand - they have 2 - I find that the 1 to 1 baking flour works best. Once you make the batter allow it to site for 15-20 minutes before baking. It uses rice like many other gluten free flours and that time is important for the rice flour to absorb moisture to avoid a gritty texture in the final cake. You can buy it online here but i usually find it easily at my grocery store as well! Please let me know how it turns out! 🙂
Thank you SO much, Ainseanlea!! You're just wonderful, my endless gratitude to you. My girl is going to love this! Will let you know how I go. In the meantime, know you're appreciated. 😉
Thanks for the recipe!
Can you tell me the amount for the olive oil? You break down each ingredient in cups which I am happy you did, but not the olive oil, I prefer measurements in cups then ounces.
Thank you!
Hi Lisa! I updated the olive oil measurements. I mistakenly stated ounces where I meant cups for that measurement 🙂 Enjoy!
What baking temperature and time would you recommend if I made this recipe as cupcakes?
350-375 °F for some doming 🙂
I made this for Easter and it was really good and looked beautiful! My questions are… the cake was not as fluffy as I think it should have been. I did not measure in grams. Could that have something to do with it being a bit coarse in texture? Also I live in Colorado and it sank a bit in the middle. Should I reduce the sugar or the temperature to fix this? It didn’t look as pretty when cut due to the sinking.
I will make it again but think I need to tweak perhaps. Thanks for sharing!
Hi Elaine - Although i add estimated imperial measurement I definitely suggest measuring in grams since it's more precise. Even a small amount of extra flour can cause a dense cake.
Unfortunately not all recipes translate without adjustments for high-altitude baking. Since the cake sunk I am assuming that the cell structure is what needs a little support (common with high altitude cakes) maybe try adding about 3⁄4 teaspoon of xanthan gum to help with stability of the cake.
This source also recommends increasing the temperature so it decreases time in the oven where the cake could dry out and also sets the structure.
Thank you for sharing this recipe!!! I came to the internet to find this & you had it ready to go. I made it for Easter & it was a hit!
Making this today for tomorrow’s Easter Dinner.
I just took them out and they didn’t rise. My hope is after I assemble they will be fine, it’s for family so not a big deal, but just wondering should they have risen?
Hi Missy, yes. They layers should rise but the rise is even with minimal doming. Lack of any rise could be for a variety of reasons like incorrect baking temp, expired baking powder or opening the oven too frequently. I hope it works out! Send me a photo once you cut it! If the texture isn't as expected seeing the crumb could help me troubleshoot where things went wrong. You can DM me on instagram @thestushkitchen!
Hello,
Could I make this 2 layers, instead of three? Would it work with the measurements?
Thanks!
If you make it 2 layers i suggest using a bigger pan (like 10-inches). Using 8 inch pas would lengthen the baking time which could cause the cakes to dry out depending on how thick the layers arw.
Hello, thanks for the recipe! I've only got one 8-inch cake pan and was wondering if it would work baking the cake at one shot and slicing it into three layers, or would it make sense to bake the three layers one by one after another (would the batter keep that long)?
I'd opt to bake the layers 1 by 1. The batter should be fine during that time. If you have six inch pans or 10-inch you can use those. I wouldn't bake it in a single pan for various reasons. First, it will take longer to cook through to the center which would ry out the rest of the cake. second, unless you have a really deep pan i don't think it would fit.
Also, if you have a sheet pan you could use that and then cut it in equal sizes to layer it. If you do that though, opt for a crumb coat for a semi-naked cake to protect the cut edges from drying out.
This cake was so moist and delicious! It is the perfect balance of sweet and tangy. The marscapone cheese really helped add a nice layer of depth to the icing. I loved it so much that I told my husband I’ll be baking my own birthday cake this year!
Thank you for sharing this recipe. I never leave comments but needed to come here to say that this cake was so yummy! I look forward to making it again.
so happy you enjoyed it💕
Hi I’m making this for Good Friday. Can I assemble all Thursday evening and put in the fridge? I’m worried about the freshness
The texture of the cake shouldn't be affected with just one night in the refrigerator so I think you should be good. Make sure you store in an airtight cake dome though. If you don't have a cake dome that fits, instead of a naked cake I'd at least do a semi naked cake (basically just a crumb coat) - it'll help lock the moisture in.
Bring the cake out ~30 minutes before serving.
This cake receive rave reviews from the fam. Wouldn’t change a thing. It was so delish. The lemon/honey/raspberry combo was spot on and the Mascarpone/Whipped Cream frosting was to die for. Will definitely make again.
So happy you and your family enjoyed it! 💕
Hi, I want to make this cake for a small gathering and only have 6 inch pans. Can you tell me what temp and how long you think I should put them in the oven for? Thank you!
Hi Laura! I'd bake at 325F still but your 6-inch cakes will likely need a little less time. I'd check on them at the 18-minute mark. At this point the most of the rise should have already passed so there shouldn't be too much of a risk of sinking.
Pull them out one they spring back lightly when pressed with a fingertip or when a toothpick comes out with a couple crumbs. Don't wait til the toothpick is clean
Hello, can I substitute the sour cream for plain greek yogurt? Thank you!
I did not test this recipe with greek yogurt but in other recipes it has flattened any sharp/citrus flavors. If you have it available I'd opt for buttermilk instead
Hi there, I’m planning on making this cake for my daughter’s bday. How many days in advance can I make the layers and store them in the Fridge.
I advise against storing cake layers in the fridge. I would use the freezer instead -it locks in moisture. I tend to freeze my cakes while they're still warn to lock in that moisture! Having said that for optimal flavor i wouldn't bake more than 2 weeks out. When you freeze, wrap the layers individually in plastic wrap tightly but not too tight where it distorts the shape. Ad the simple syrup when you assemble the cake after thawing.
Hi! Thank you for sharing! I am looking to make this cake for Easter Dinner. If I make the cake the day of and add the frosting a couple of hours before dinner, will the frosting hold up or will it start to become runny like whip cream after it's been sitting for a while?
The mascarpone stabilizes the frosting so it'll hold up! It won't be like regular whipped cream at all 🙂
Ok thank you!!